BAROQUE TO MODERN IMPRESSIONIST

Goals + Design skills to learn:
- learn about & be inspired by the master artists in history and take away a quality visual to remember them by
- expose students to interesting and unique mediums (art supplies), which are forgiving and easily create successful projects
- identify that art goes beyond drawing people…. too often people think they must be able to draw a person to be creative, which is not true
- demonstrate a professional presentation of artwork
- provide an art gift for our students & their parents that they may want to display in their home
- provide resources for students to use the tools learned in class at home (feel free to give parents the link to our blog so they can easily find supplies, tutorials, demos, and instructions to replicate the projects at home)
Tips for instructing An aRt Adventure + set up:
- you will need a full 30 minutes to complete these projects
- consider using your morning assembly time to present the artist in detail and then briefly review how the project relates to the artist during art time
- set up only one art location for all classes to rotate through …. by doing this you only need to purchase 8 or so of most items
- invite at least two helpers who will familiarize themselves with the projects & help with all the classes rotating through…. one to help the class creating and one preparing supplies for the next class
- prepare and pre-cut as much as possible before class meets
- instructors should demo the project before class meets and provide a sample for students
- always start by having students write their name on the back of their project…. if they desire to write their name on the front encourage them to do it once they’ve completed their piece in tiny excellent lettering under the painting
- i highly recommend listening to the podcasts provided on ridge light ranch for the artists we will be studying …. they will help you prepare immensely
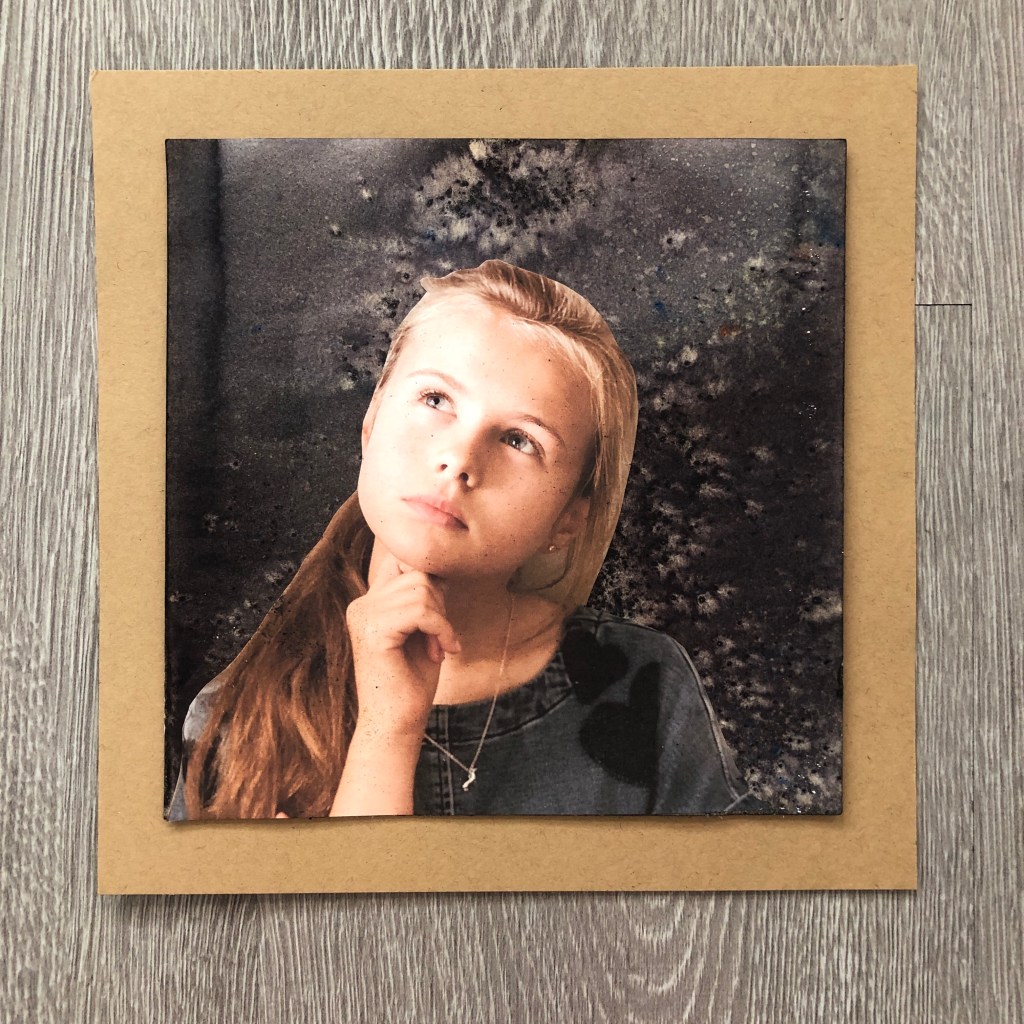
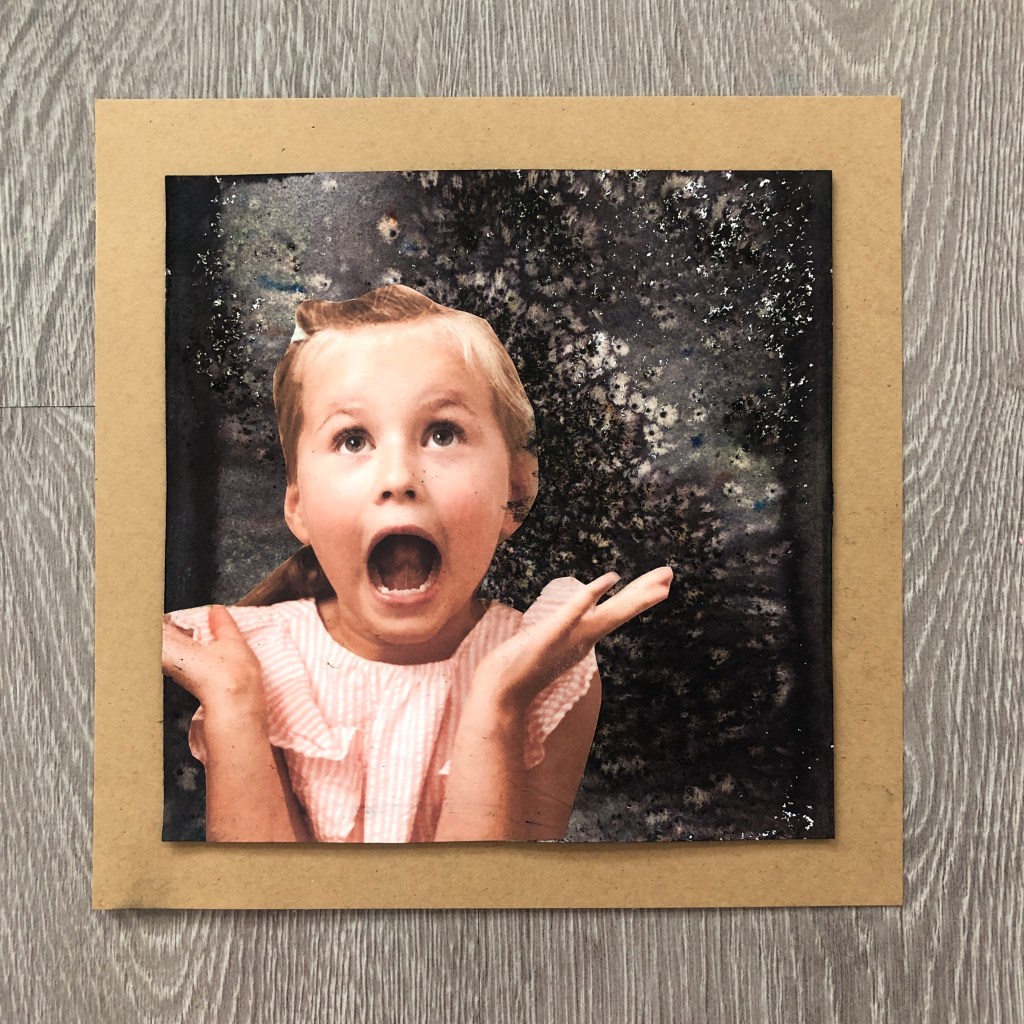
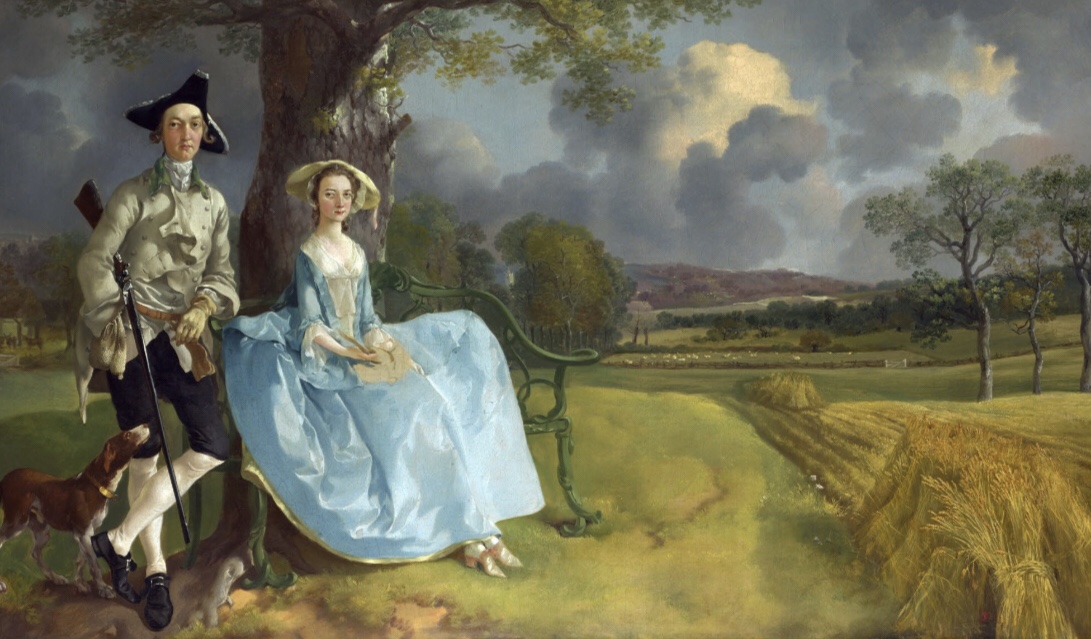
NO.1 RembrandT 1606-1669 bAroque

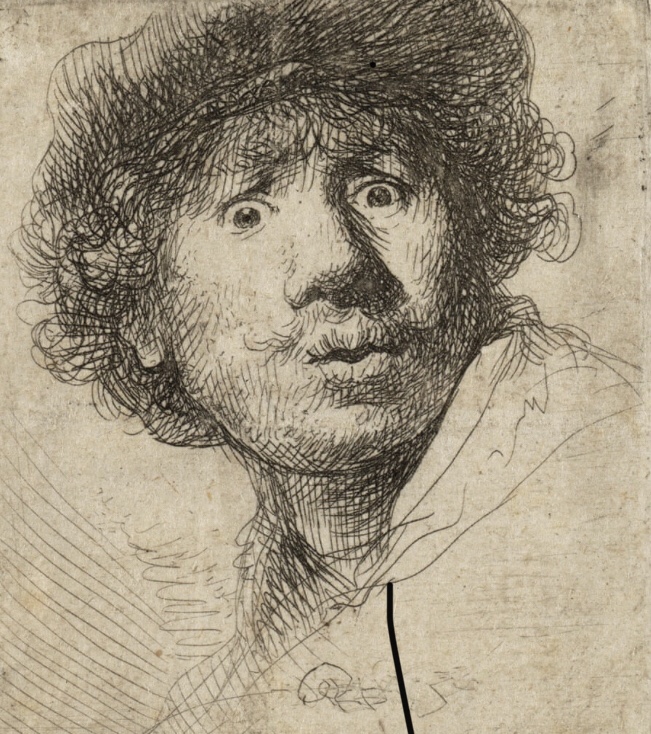
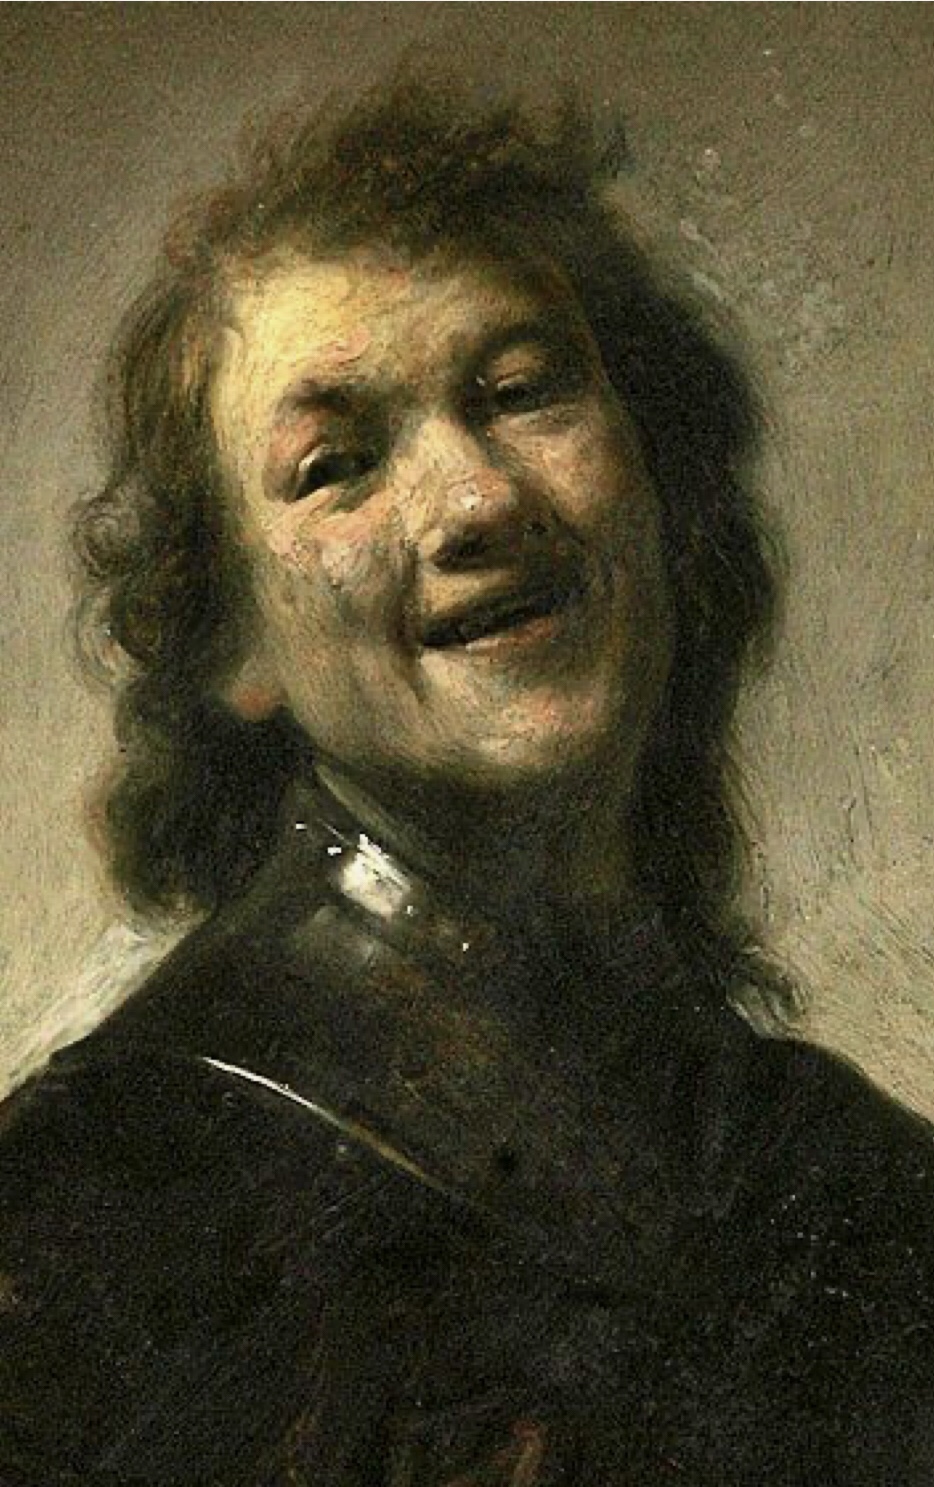
The project+the artist
Project inspiration:
- focus on the emotion and personality rembrandt captures in his portrait’s facial expressions
- provide a photograph of each student making an exaggerated facial expression …. ask: do you look happy, sad, surprised, confused and why?….. examine eyebrows, eye shape, mouth shape and expression
- create a dramatic background as we find in rembrandt’s portraits
Materials
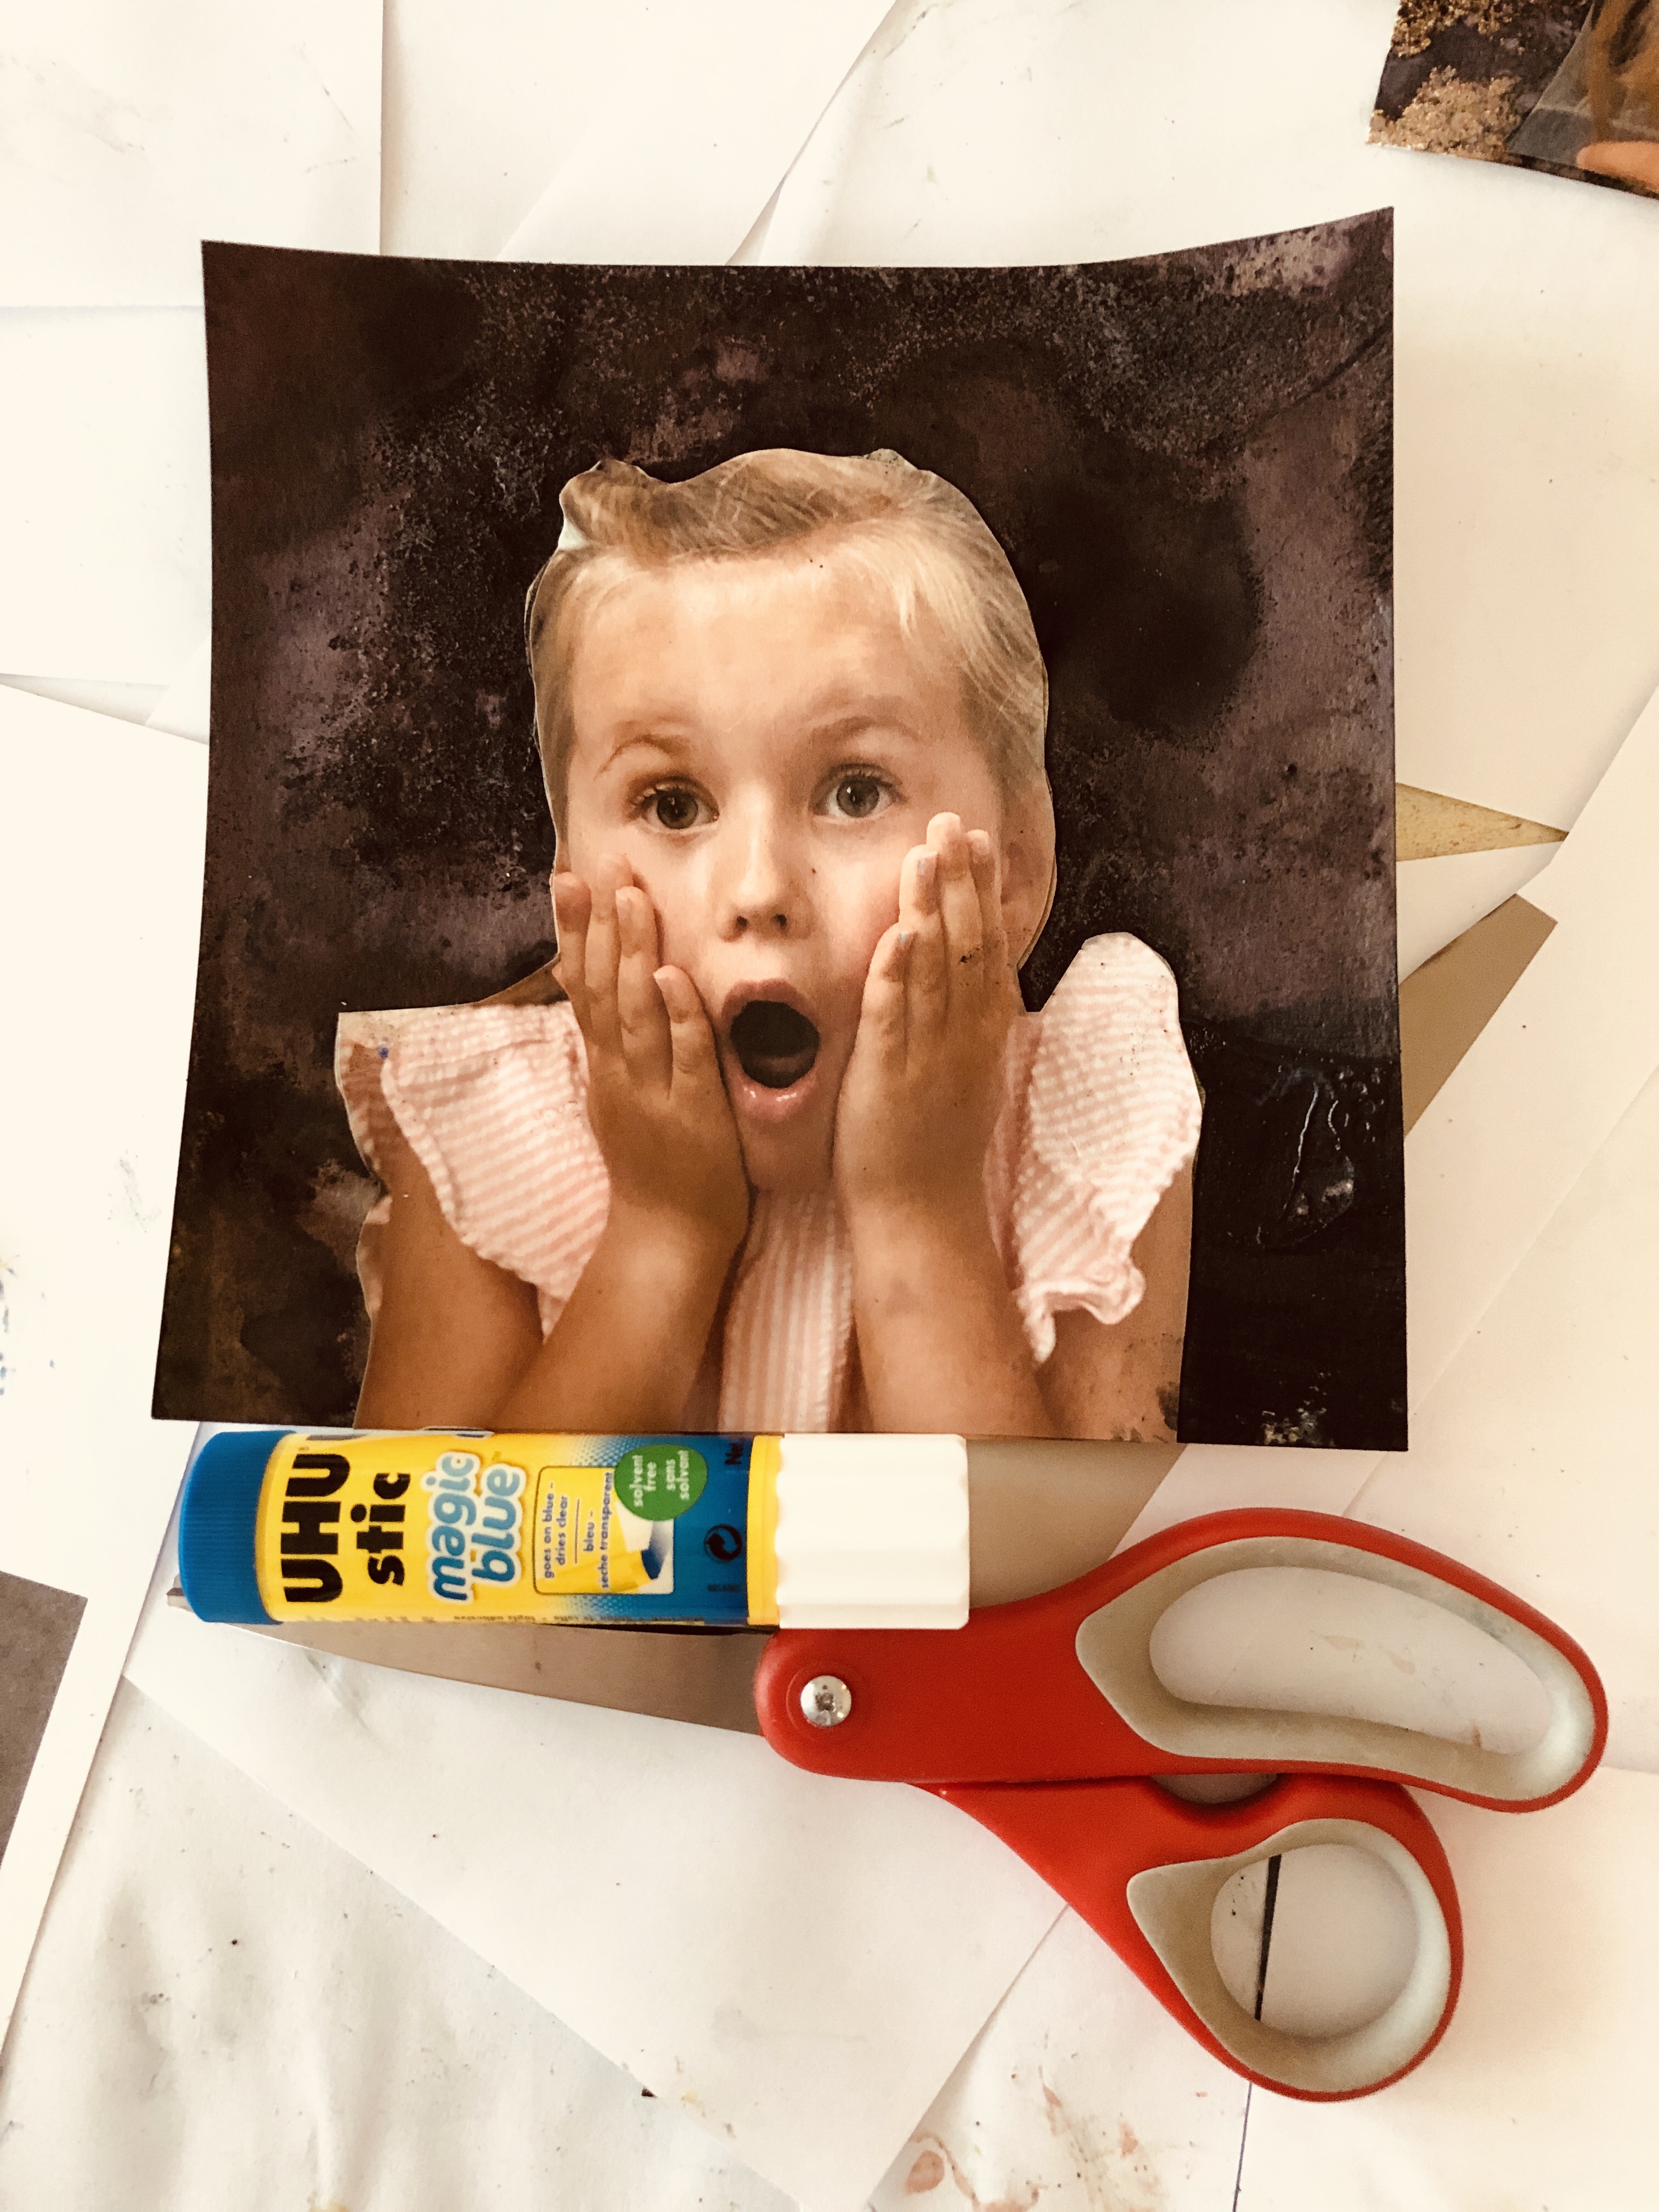
- pre-cut printed photograph of each student making an exaggerated facial expressionon. print on plain paper using a home printer (see notes below for details)
- pre-cut 7”x7” watercolor paper
- pre-cut 8 1/2”x8 1/2” natural brown cardstock for presentation
- paper cutter is handy
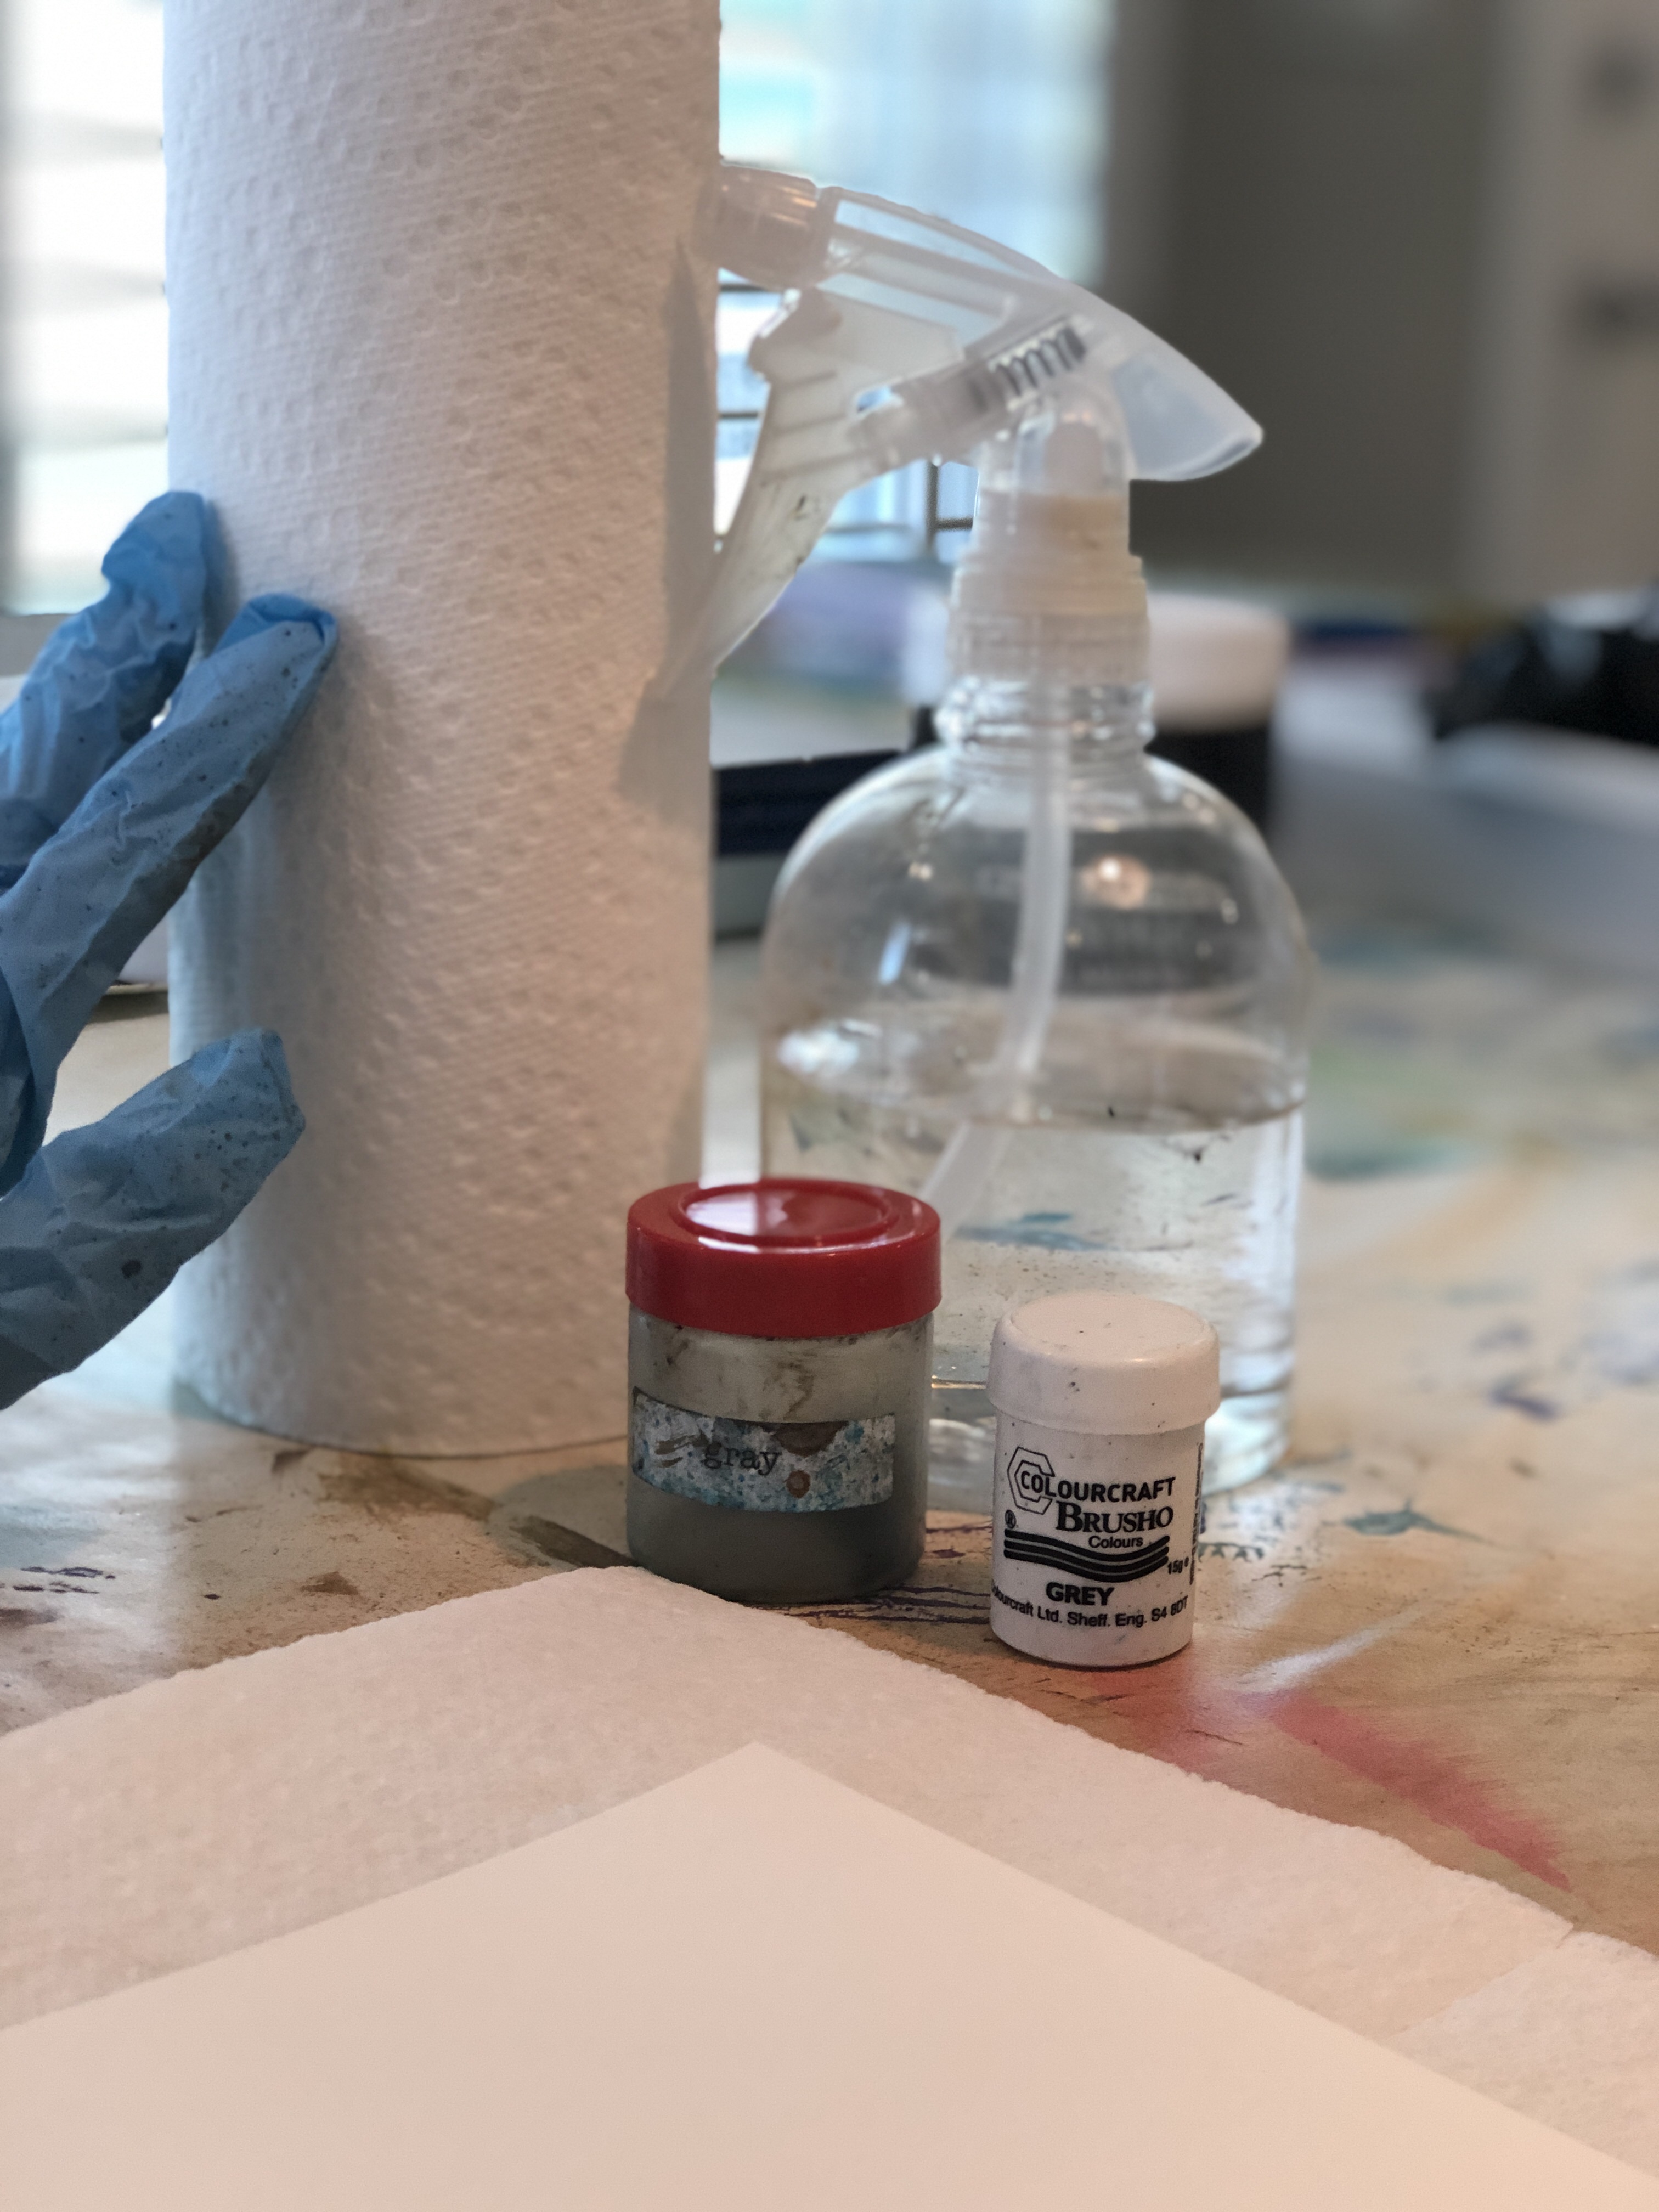
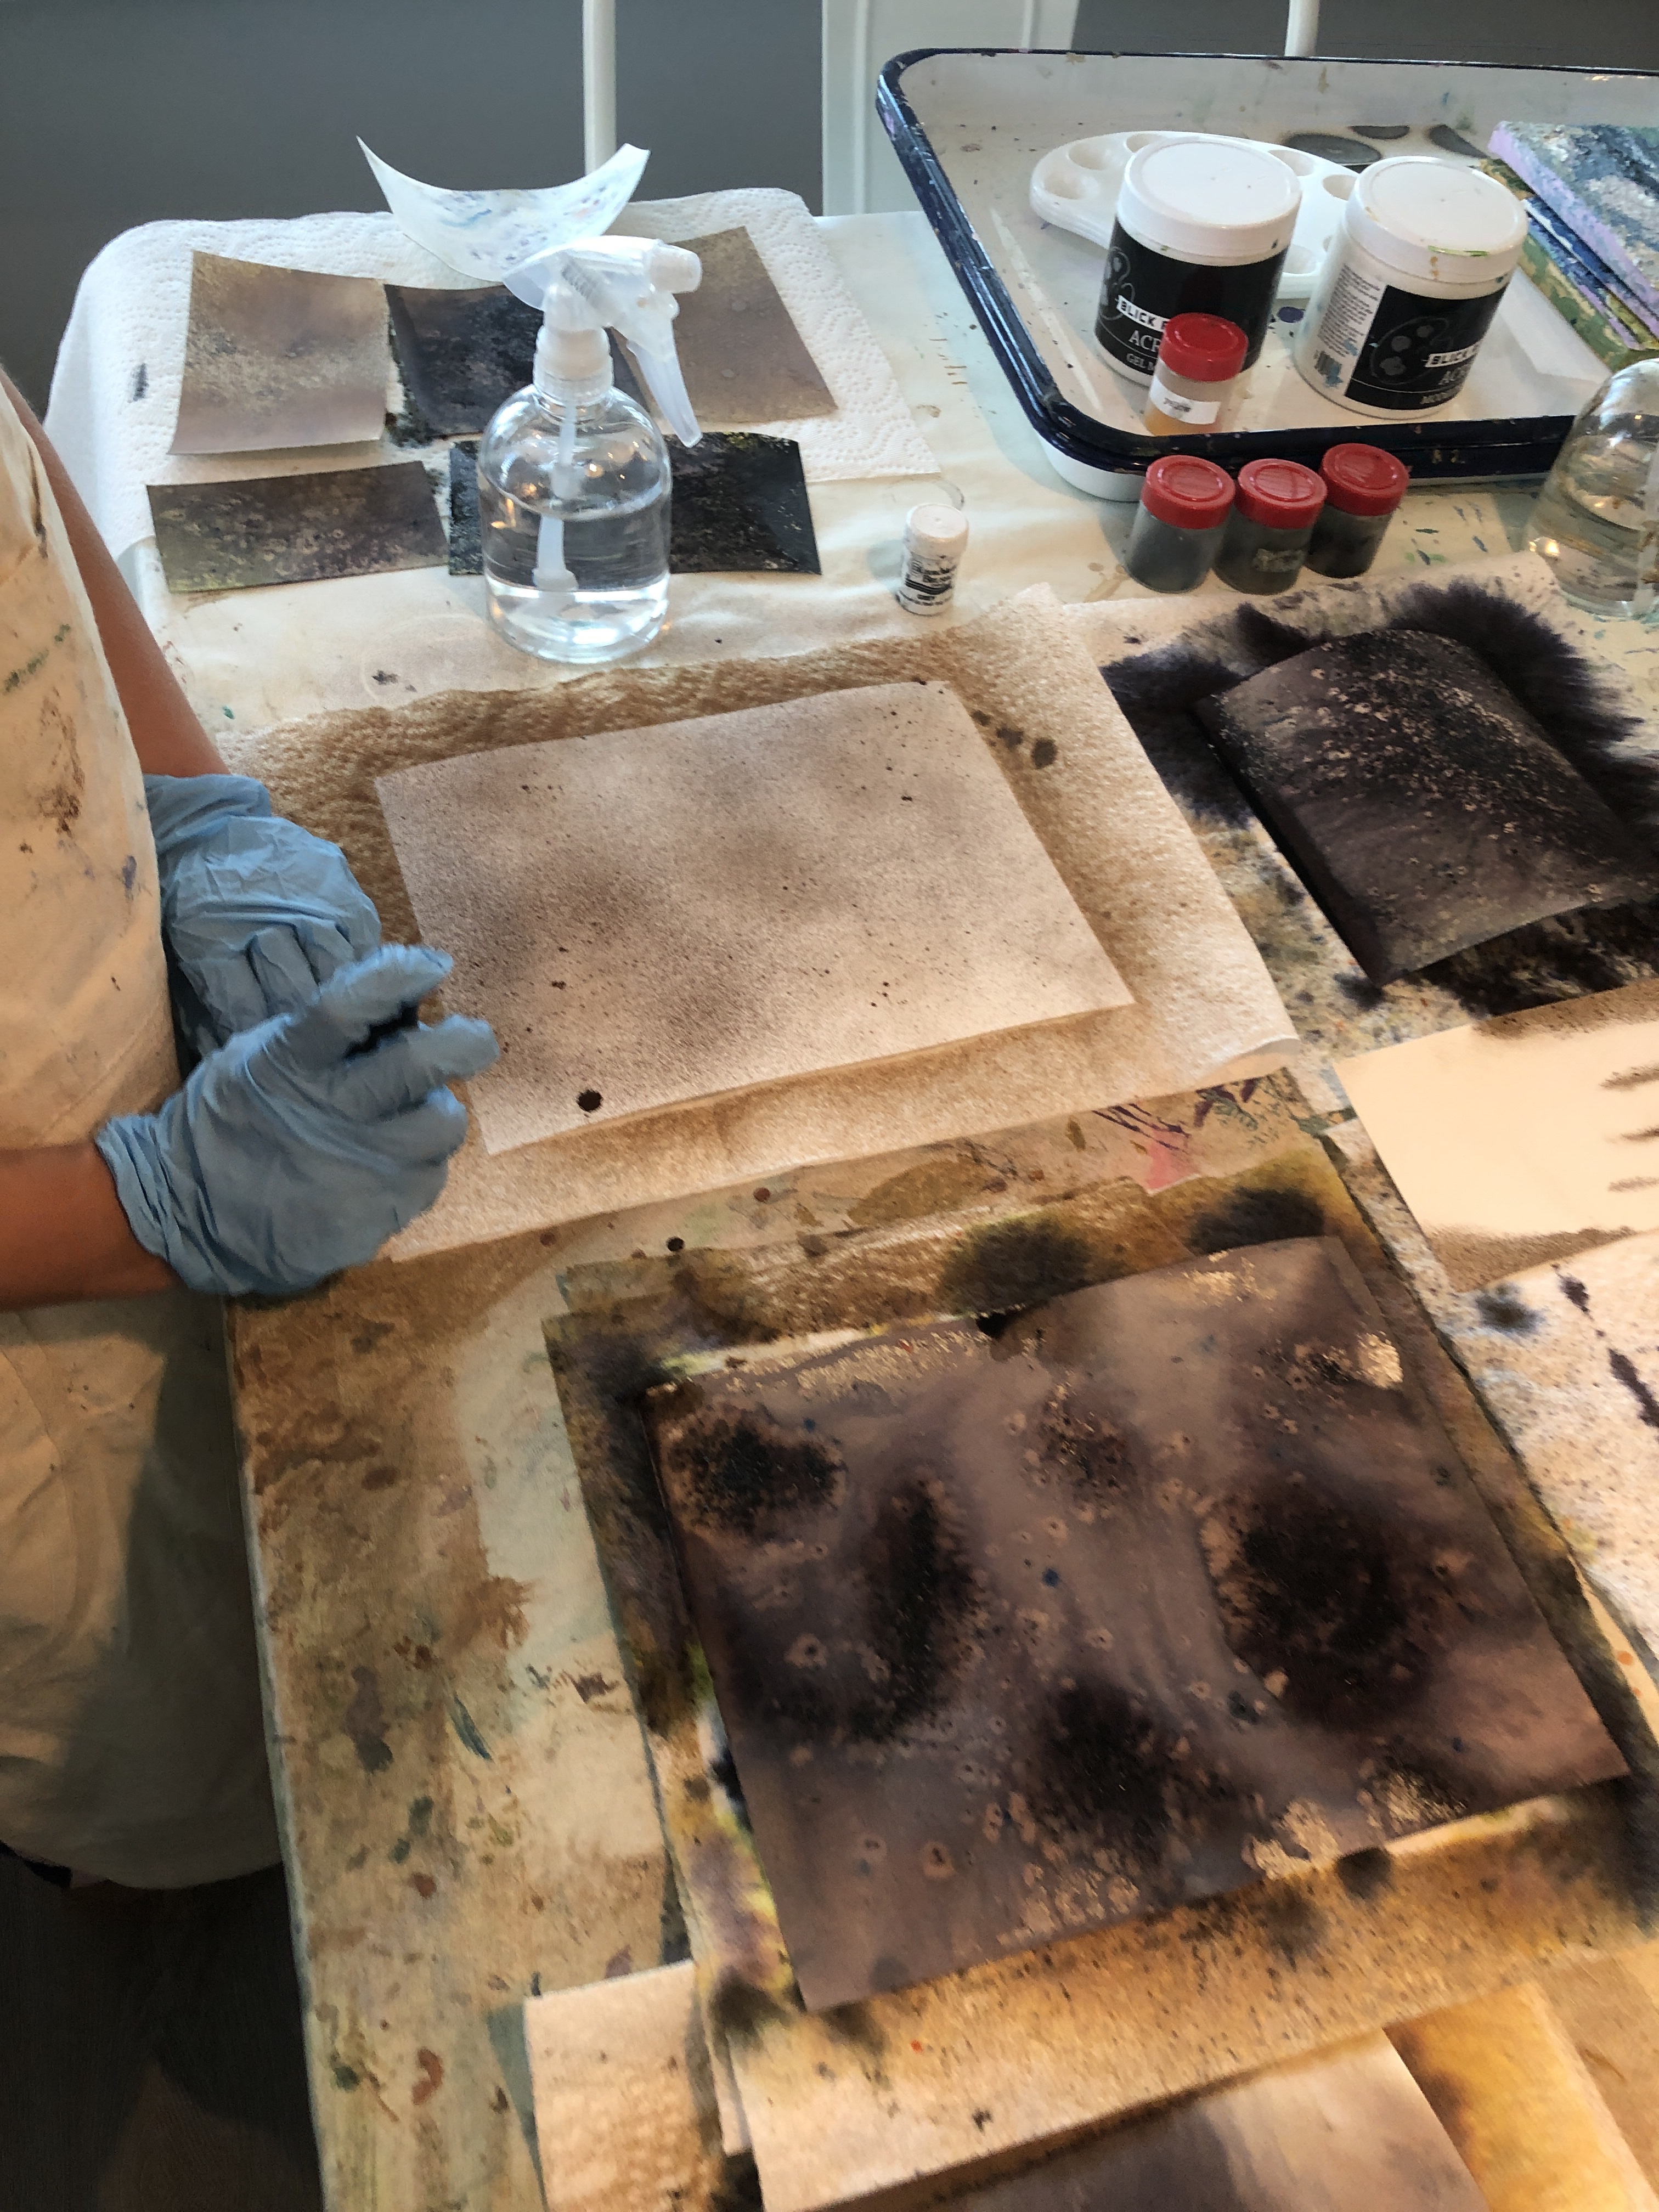
- gray brusho crystal colour watercolor crystals
- spice containers to separate watercolor crystals into (if you’re able …. one container per student in a class) …. a little watercolor crystal goes a long way …. tape to tape off all holes except one on spice container lids
- spray bottles (if you’re able …. one per student in a class)
- art dryers or blow dryer
- paper towels
- disposable gloves (optional)
- scissors
- glue sticks (if you’re able …. one per student in a class)
- 3M foam tape tear into squares
The photo:
- photograph each student making an exaggerated facial expression…. note: fingers are difficult to cut out…. consider poses where fingers won’t need to be cut out
- depending on the photograph you may want to consider applying a “filter” to your photo to reflect a rembrandt inspired color palette…. i used a vivid warm filter on my iPhone
- student’s photo should be approximately 6”H when cut out
- print on plain paper using a home printer
- print and pre-cut all photos prior to class
The background
- prior to class pre-cut 7” x 7” watercolor paper for each student
- in class design a rembrandt inspired background using gray watercolor crystals (see demo)

THe PRESENTation


- consider designating a table for wet watercolor crystals and a separate table for assembling the dry final product and presentation
- dry watercolor crystal background with an art dryer or blow dryer
- adhere pre-cut photo to the watercolor crystal background with glue stick
- use 3M foam tape to mount project to 8 1/2”x8 1/2” natural brown cardstock for a professional presentation.
No.2 Gainsborough 1727-1788 romantic

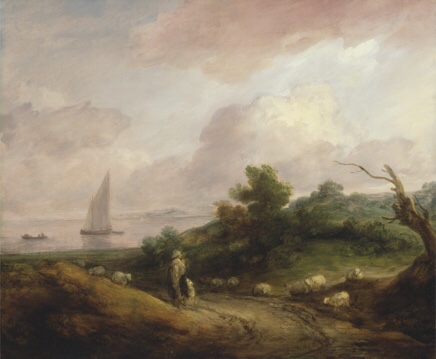
THE PROJECT+THE ARTIST
PROJECT INSPIRATION:
- focus on gainsborough’s true passion for landscapes
- gainsborough was commissioned for portraits, but loved landscape paintings … he applied studio painted portraits to idealistic landscapes
- use his painting “coastal landscape with a shepherd and his flock” as our inspiration
- apply a grainsborough color palette & mood with watercolor


MaTerials
- pre-cut 7”x7” watercolor paper
- paper cutter is handy
- reeves student watercolor tube set: use yellow ochre, burnt sienna, cobalt blue, chinese white, payne’s grey, burnt umber, sap green
- paint palette trays (squeeze a dab of watercolor paint into one for each student)
- watercolor brushes
- cups of water that will stay steady
- have water handy & a place to pour dirty water after each class
- paper towels
- art dryers or blow dryers
- newspaper, trader joe’s flyer, or book pages
- glue stick
- pencil
- scissors
- pre-cut 8 1/2” x 8 1/8” natural brown cardstock
- 3M foam tape

See Gainsborough tutoriaL
Apply sailboat
- consider doing the remainder of the project at a separate “dry station or table” away from watercolor….. this also allows helpers to set up the watercolor station/table for the next class coming in
- just as Gainsborough applied portraits to his landscapes we will apply a sailboat to ours by cutting out a triangular shape from newspaper, trader joe’s flyer, or book pages
- adhere to the painting with a glue stick
- use a pencil to shade and the sailboat and draw a reflection in the water
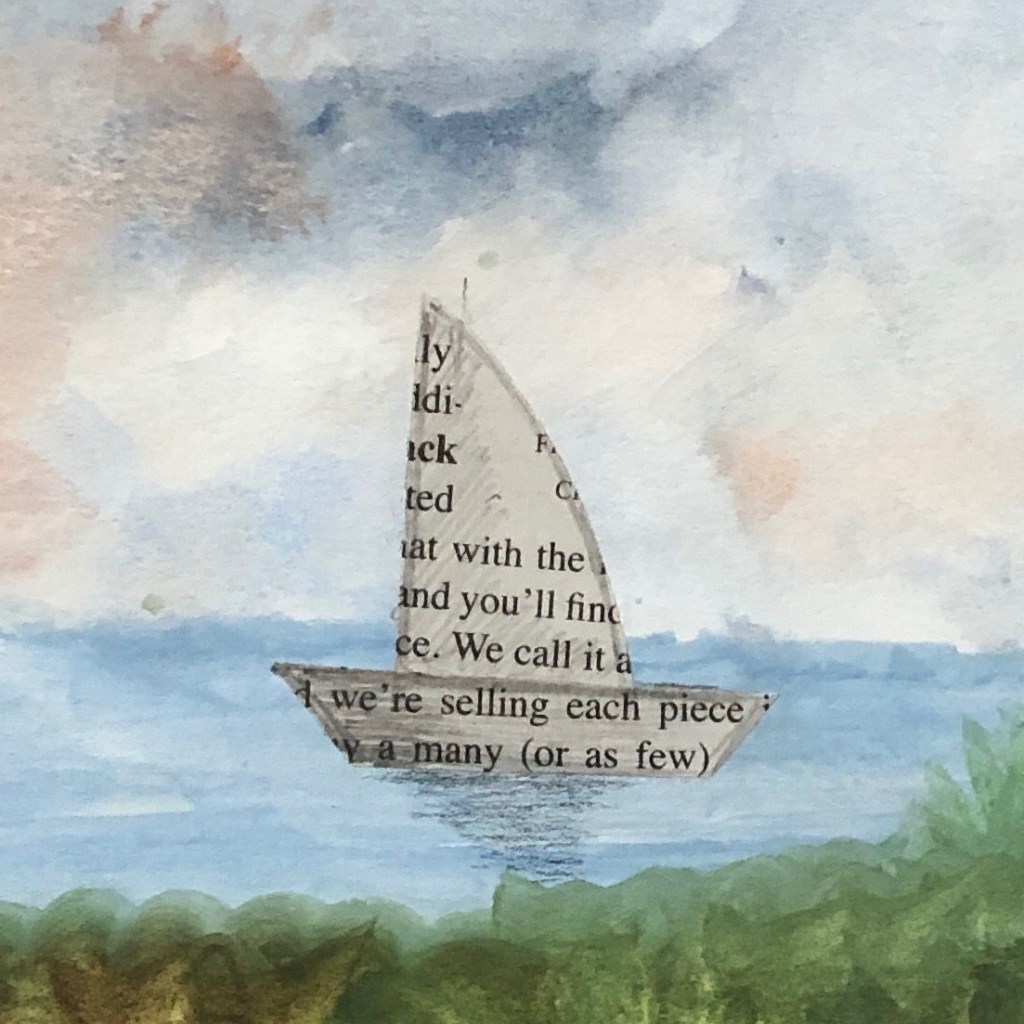
The presentation
- with 3M foam tape mount painting to pre-cut 8 1/2” x 8 1/2” natural brown cardstock for a professional presentation
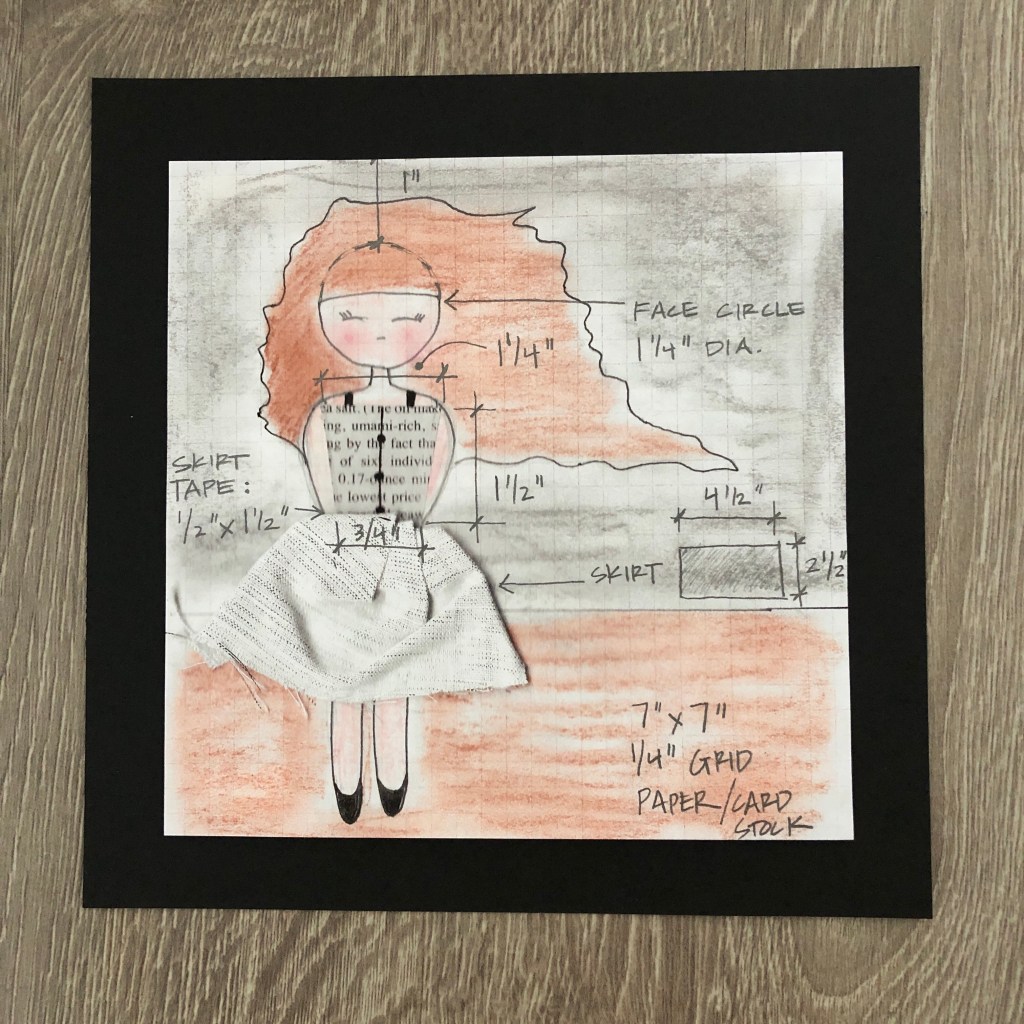
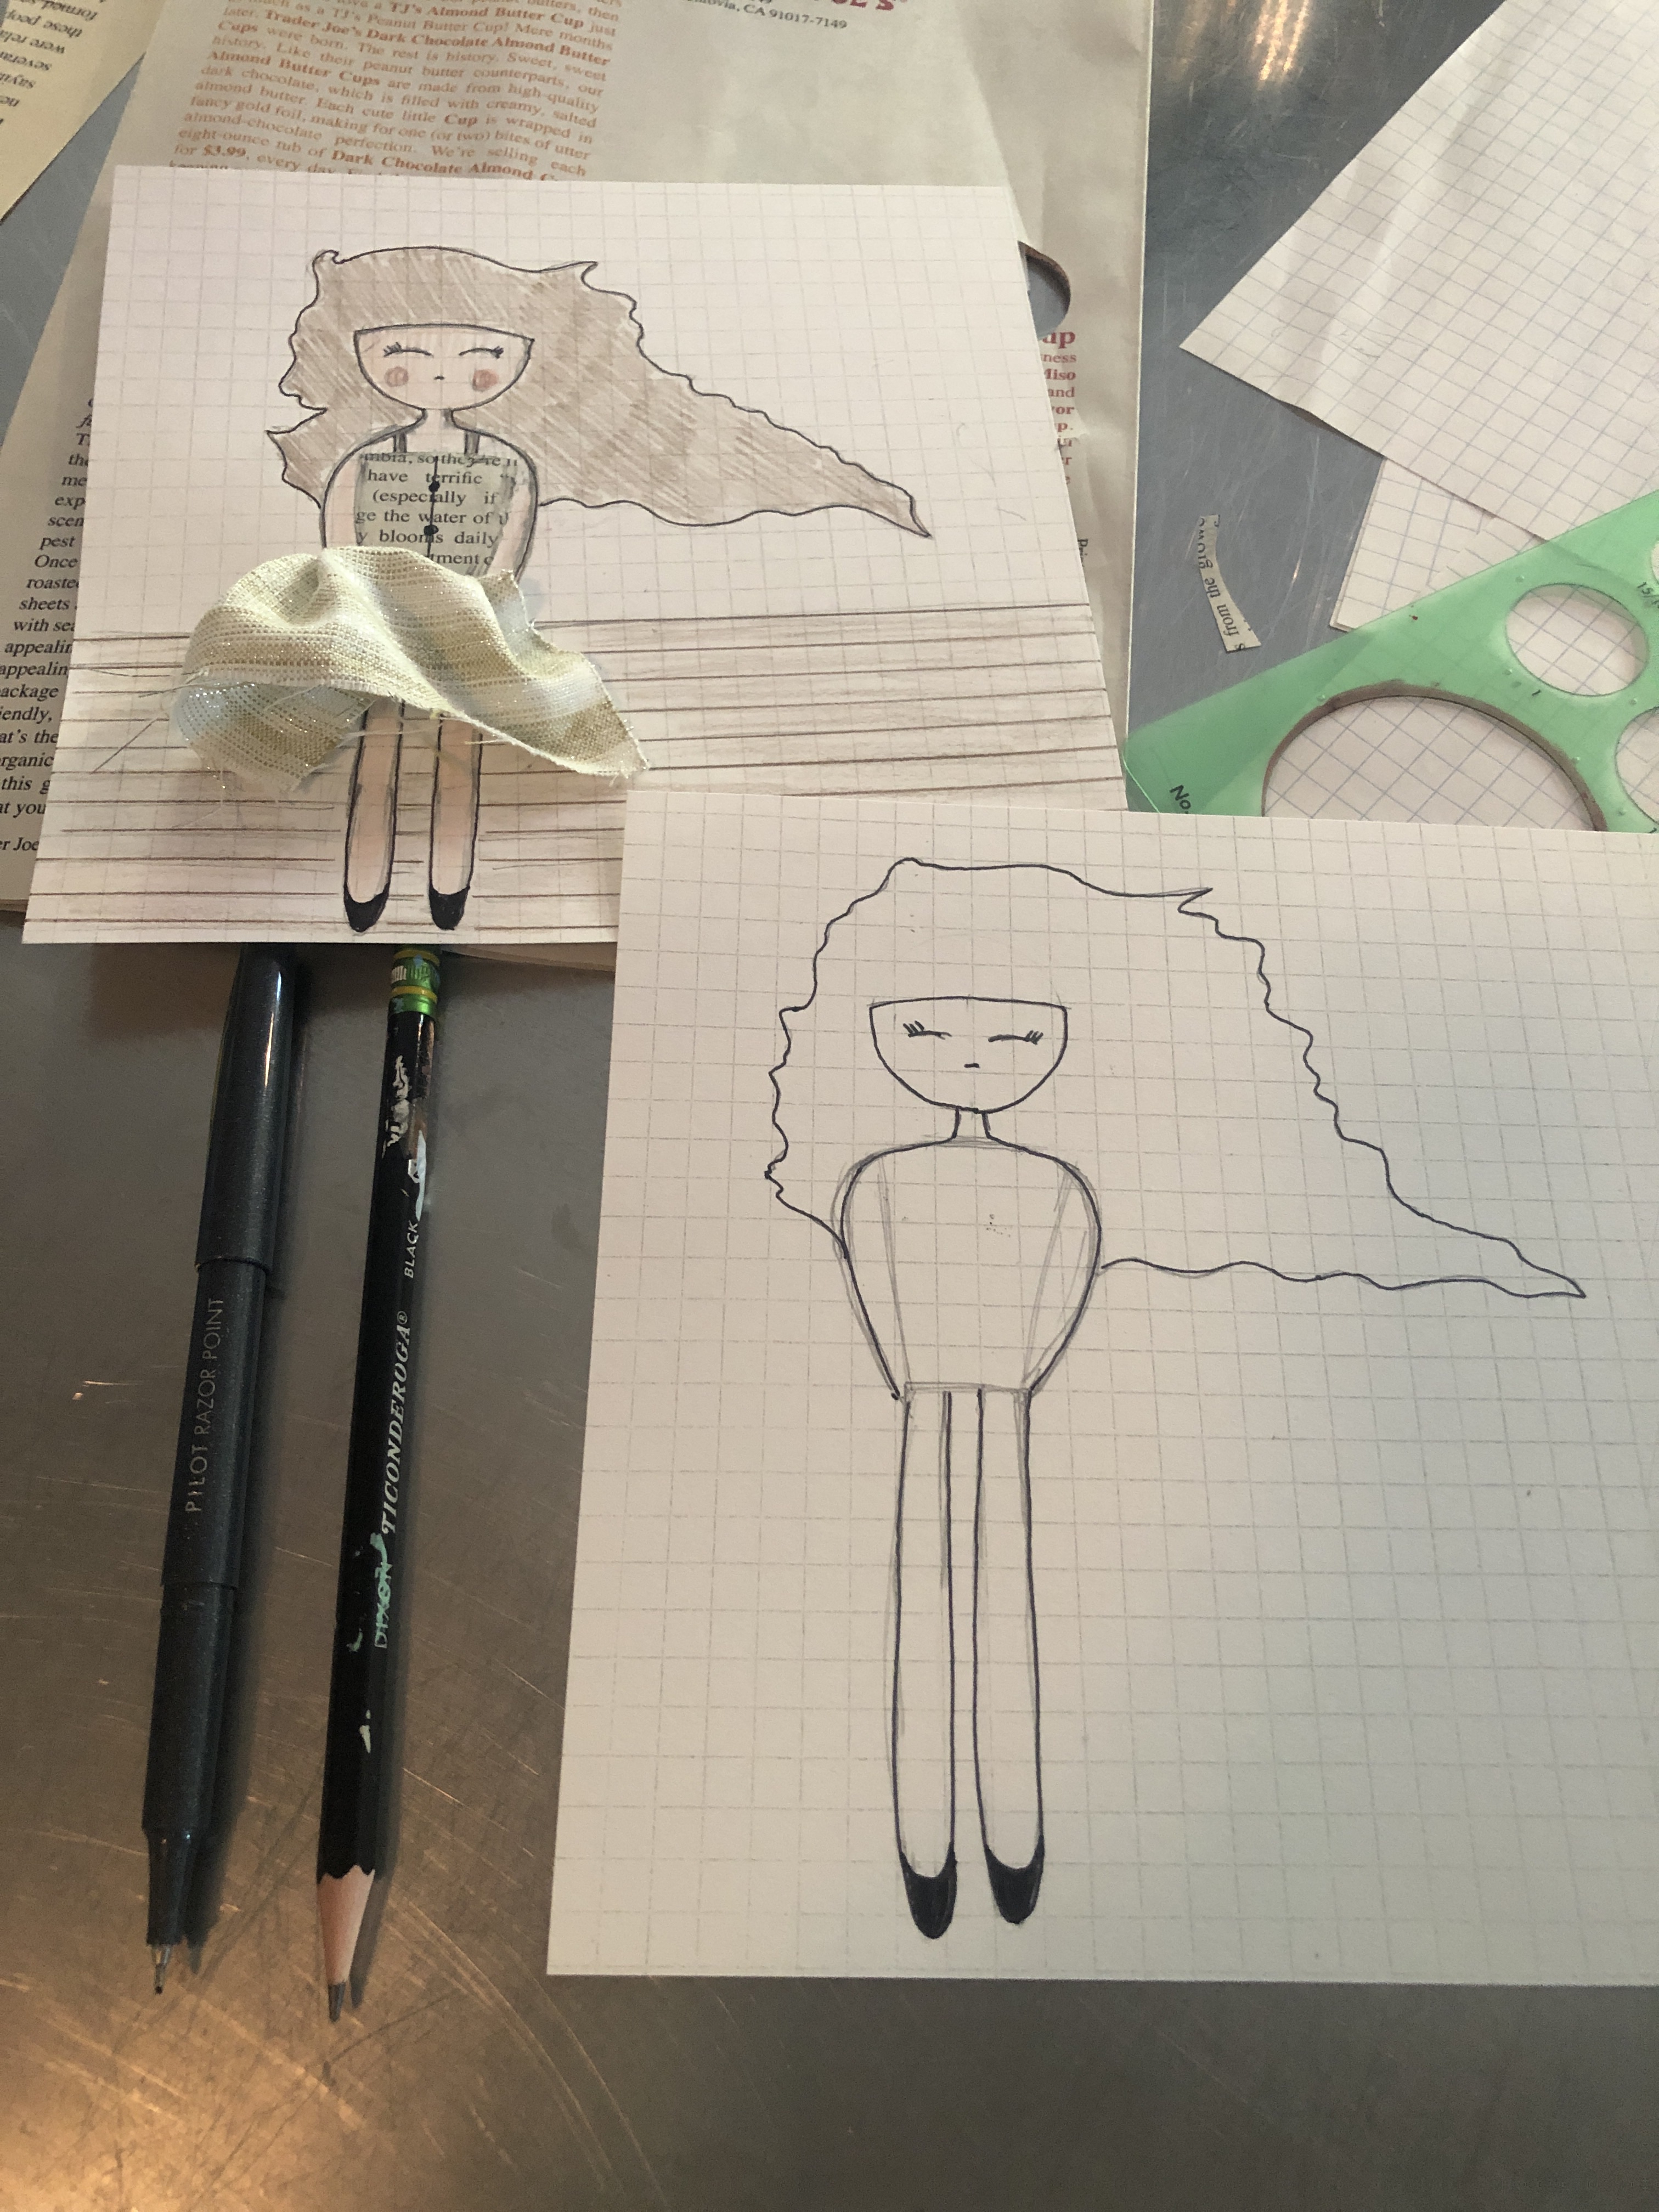
No.3 Degas 1834-1917 impressionist
ballerina project for girls

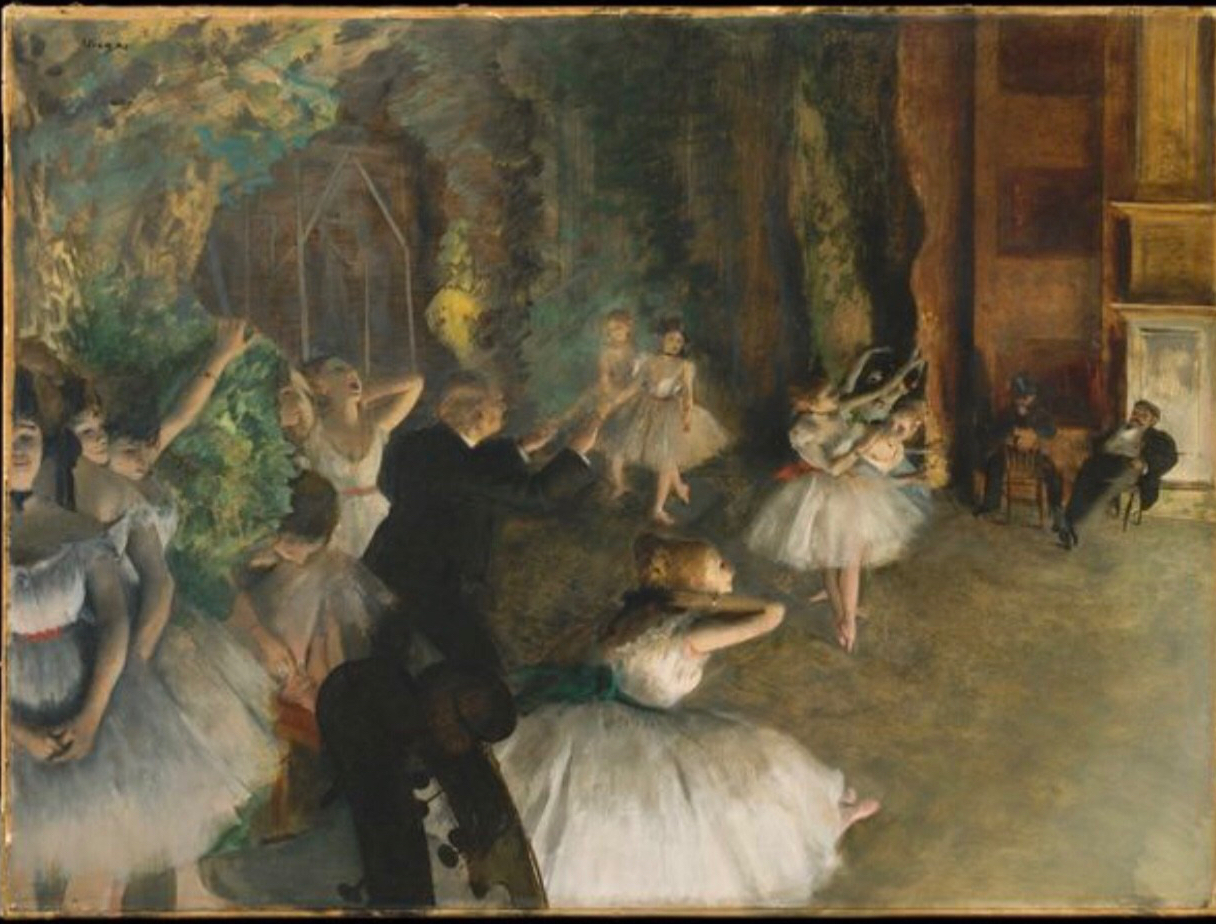
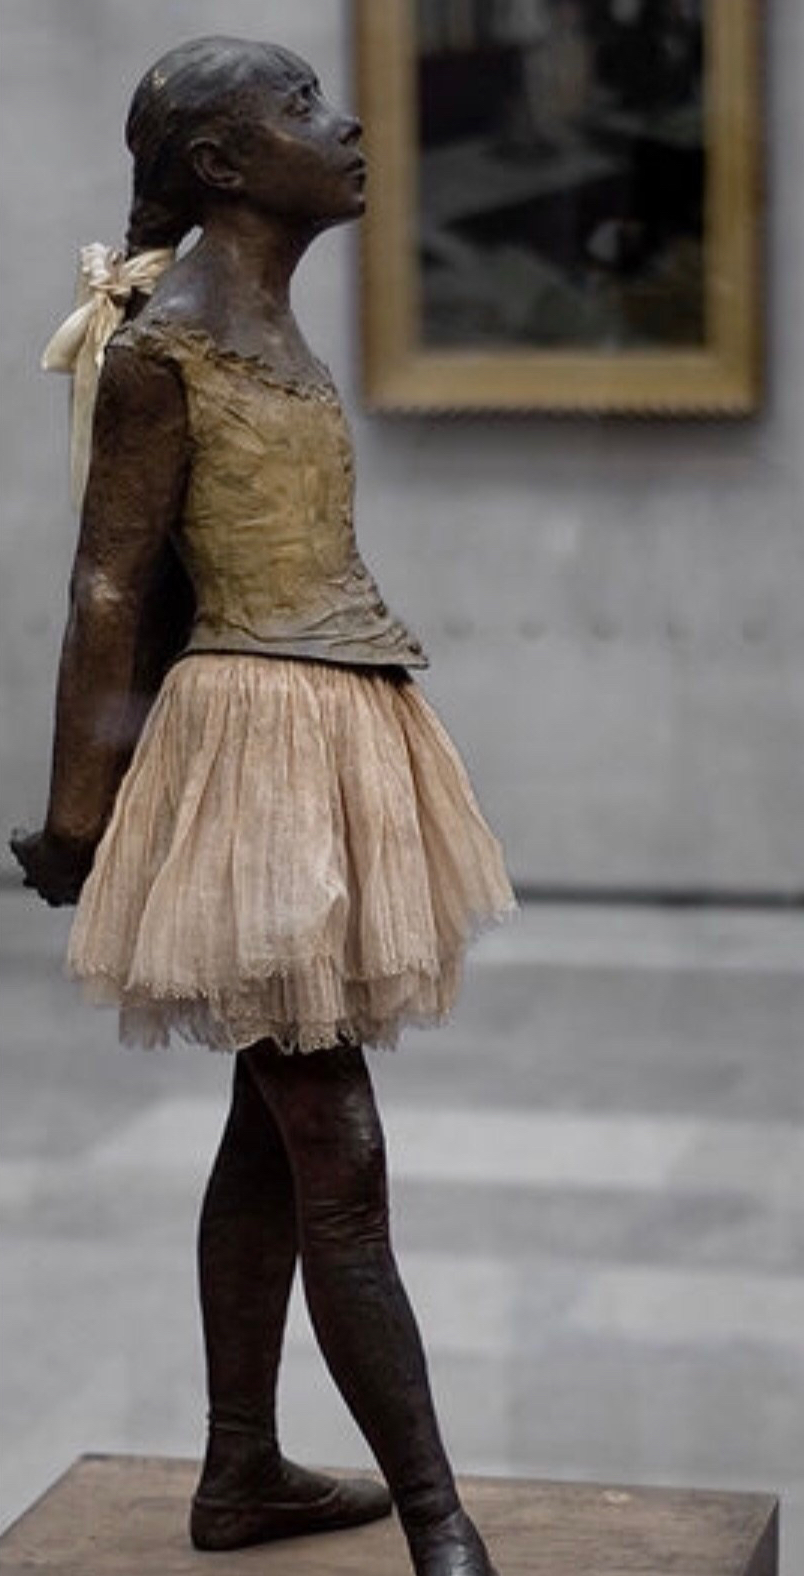
The proJect + the artist
project inspiration:
- this project is inspired by degas’ clothed ballerina sculptures
- focus on capturing motion, which degas successfully accomplished in his dancers
- use pastels… a medium degas often sketched with
- draw on gridded paper a nod to degas as a draftsman
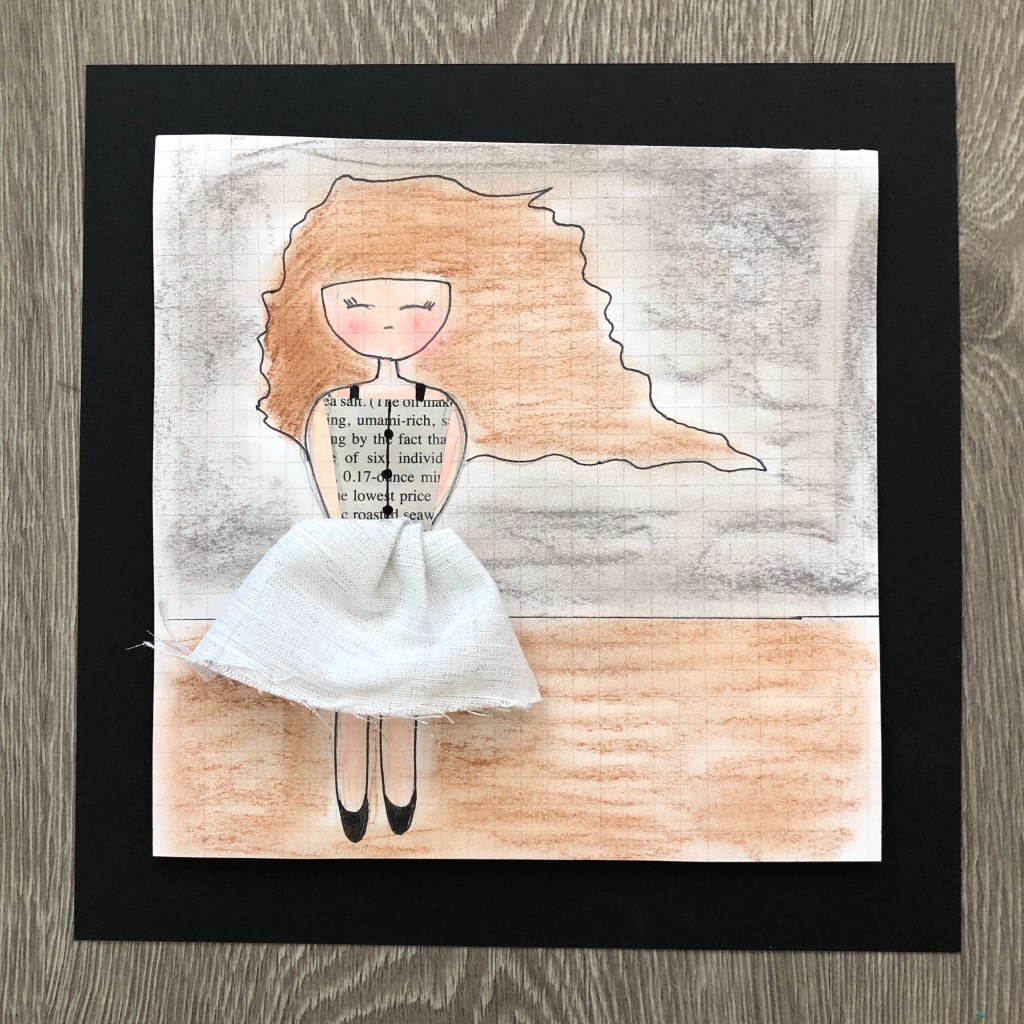

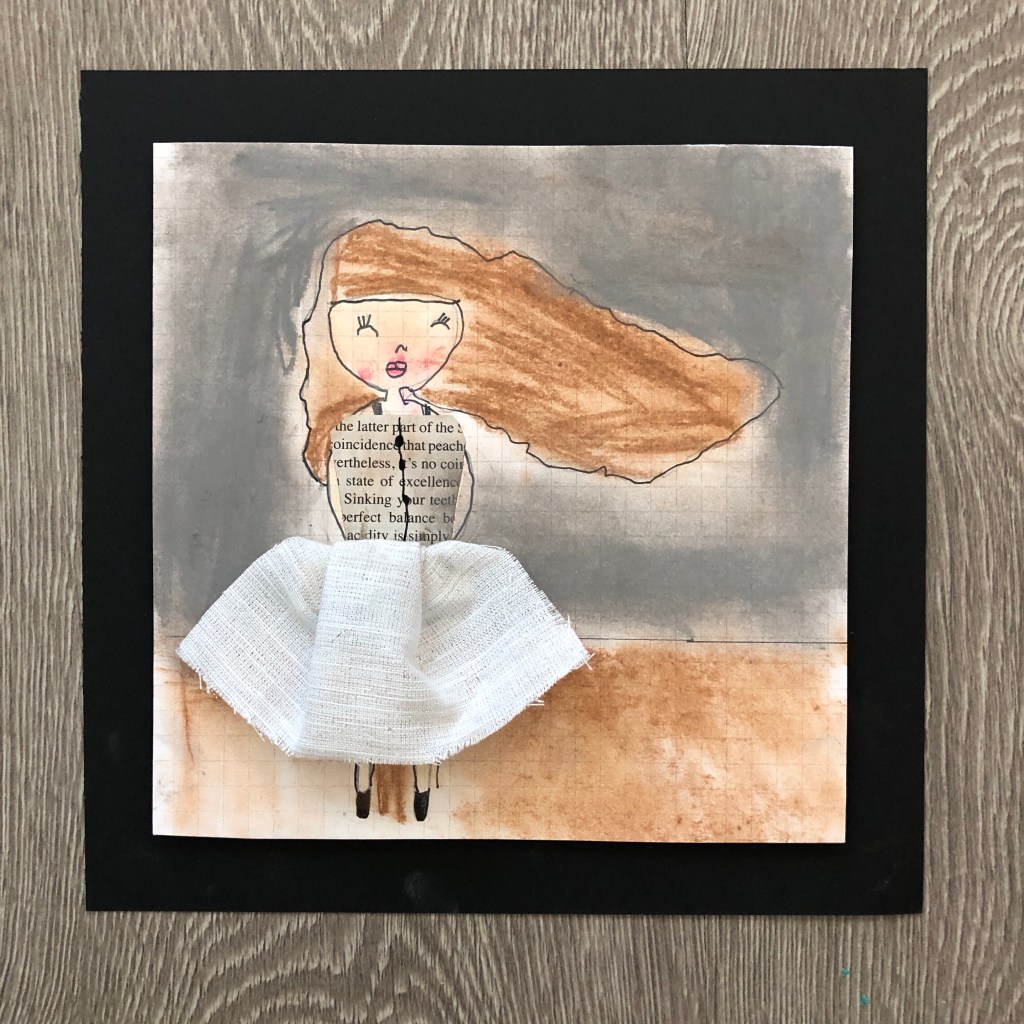
Materials
- pre-cut 7” x 7” black and white 1/4” grid graph paper (link to printable graph paper)
- pre-cut 8 1/2” x 8 1/2” black cardstock
- paper cutter is handy
- pencil
- black felt tip pens or thin sharpie
- pre-cut 1 1/4” cardstock circle to trace the face
- newspaper, trader joe’s flyer, or book pages
- chalk pastels (we used prismacolor nupastels: peach (skin), rose (cheeks), gray (walls), brown (floor & hair) …. consider breaking thr pastels in half so two students can use one
- fabric for skirt (i used metallic FR fabric roll strips from joann’s)
- glue stick
- 3M foam tape

Degas ballerina project TutoriaL:
BalleriNa project dimensions

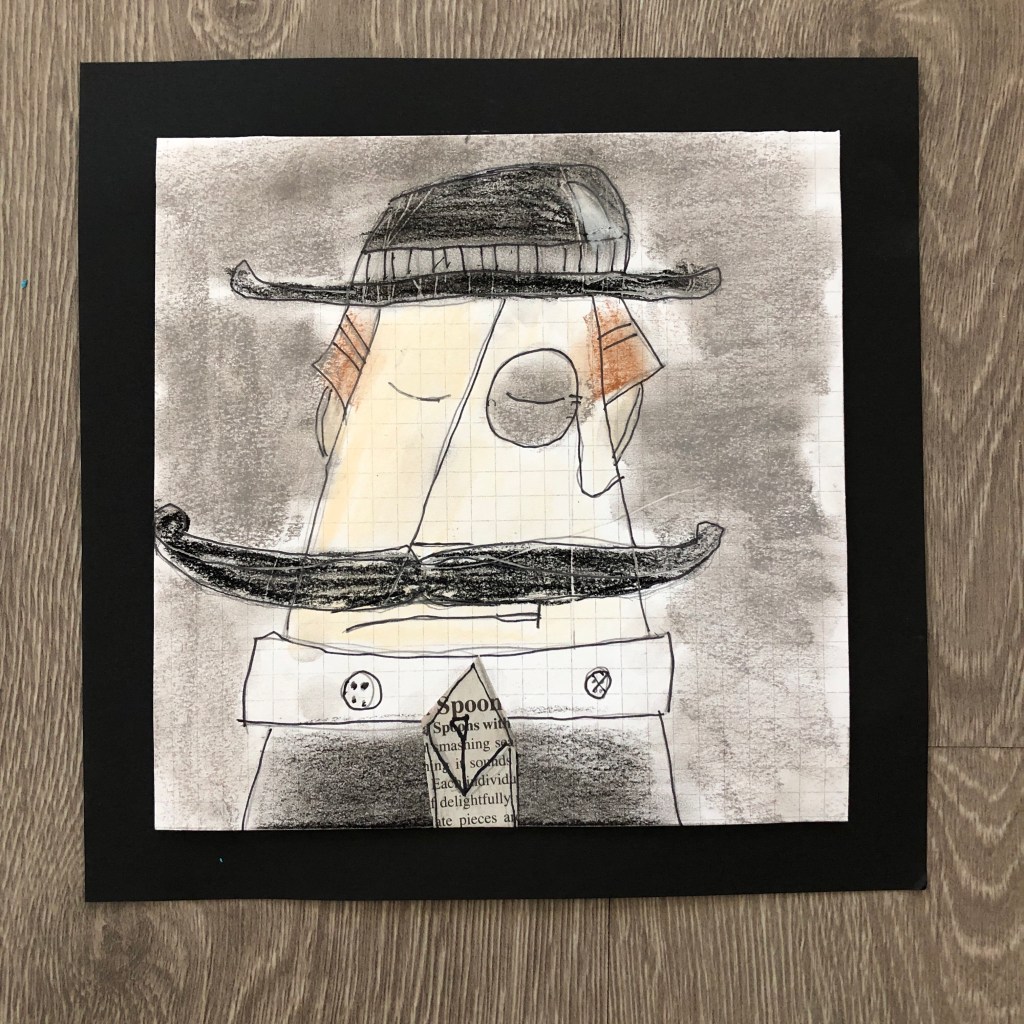
Cotton exchanGE project for boys
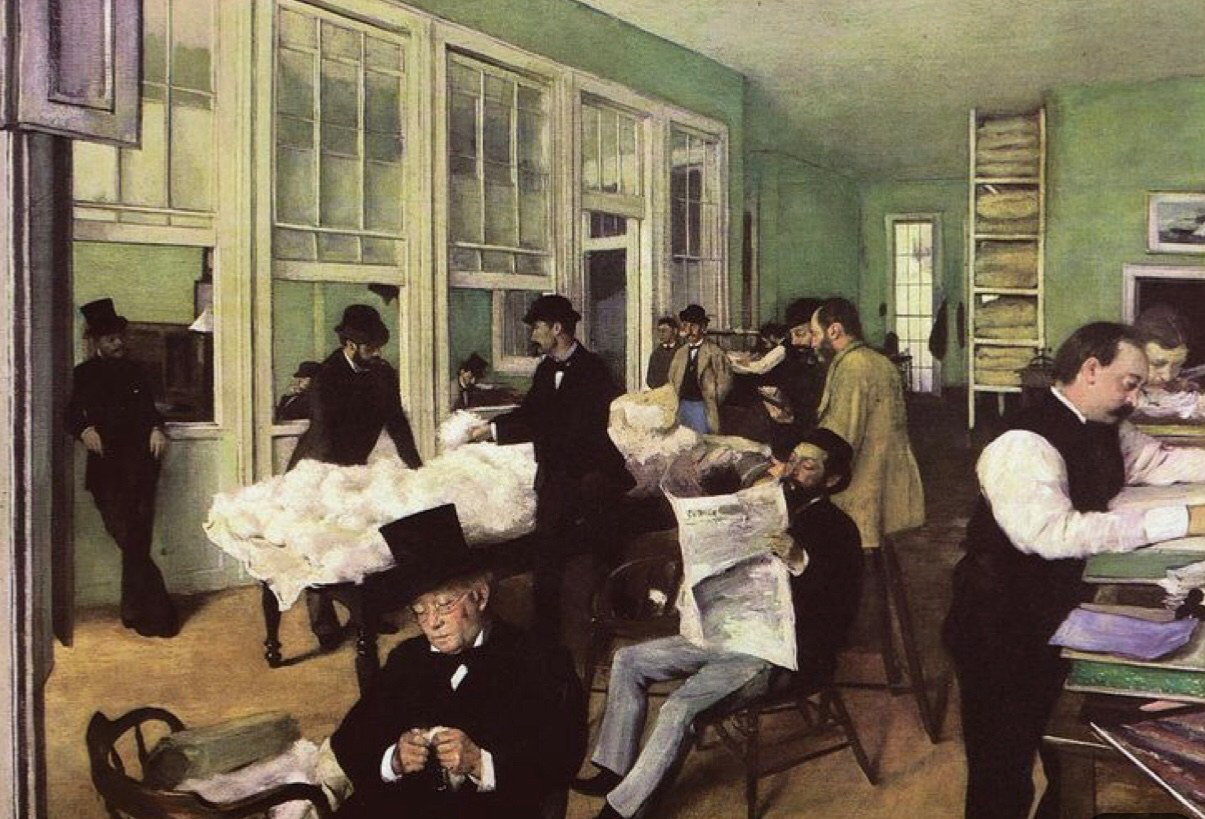
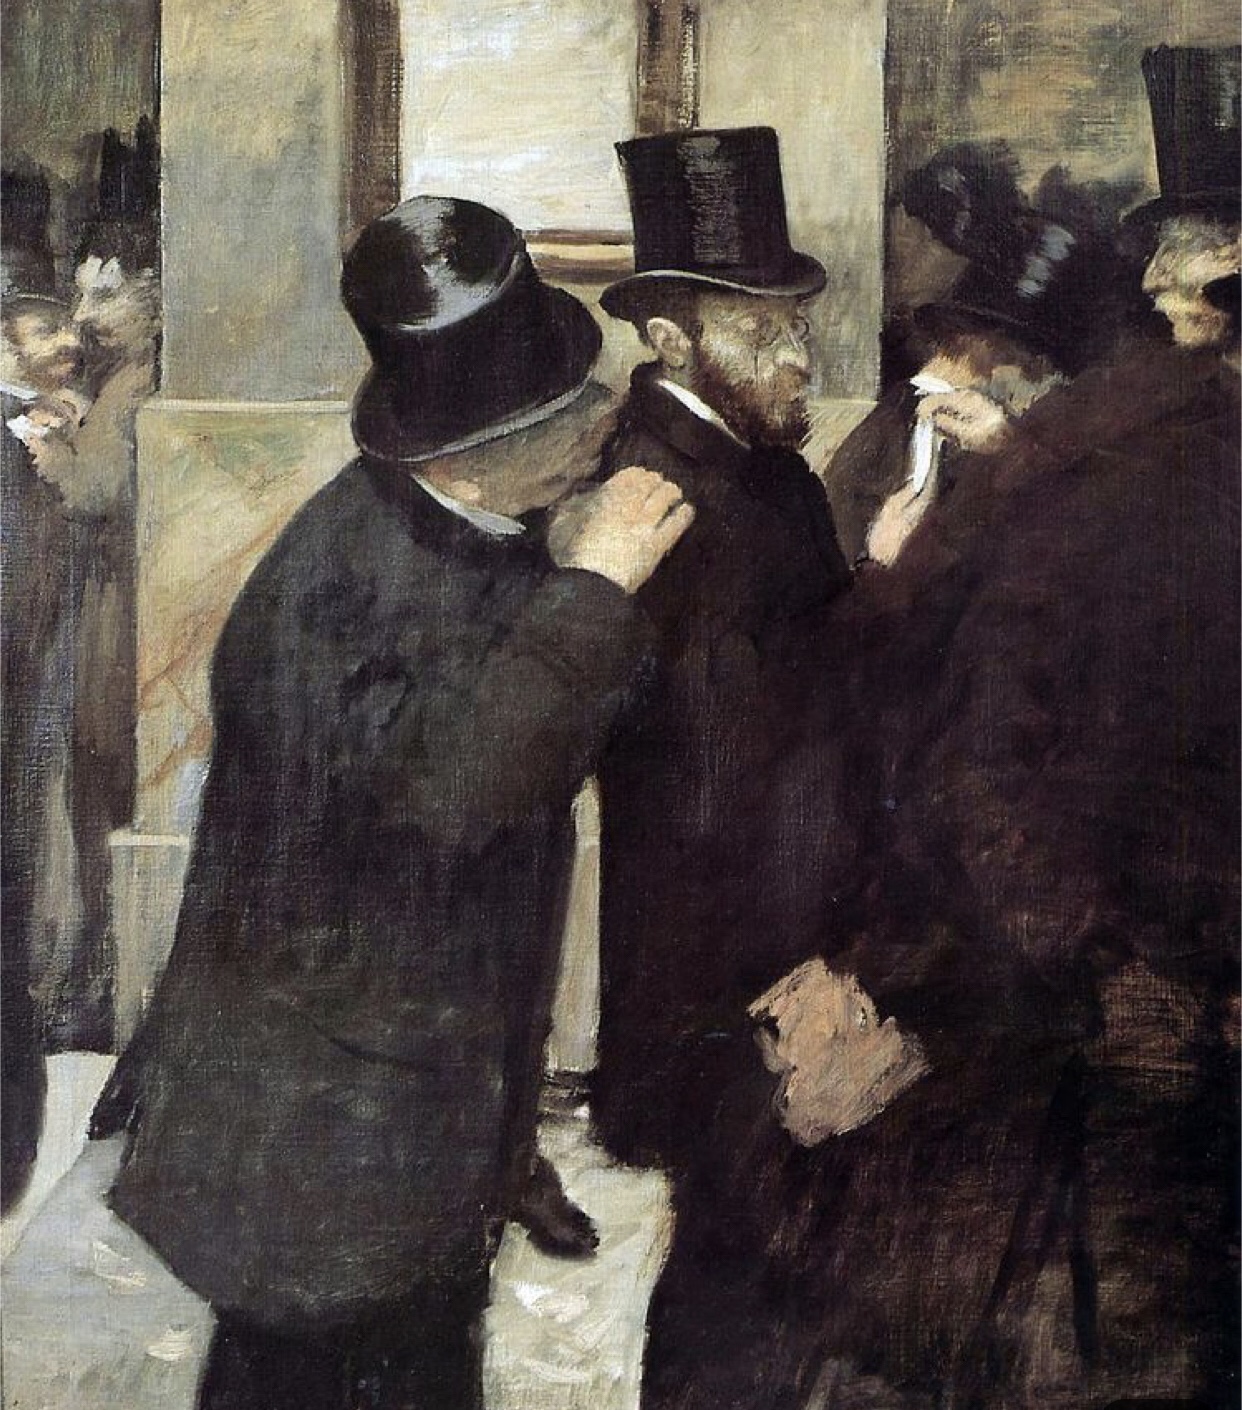
THE PROJECT + THE ARTIST
PROJECT INSPIRATION:
- focus on degas’ cotton exchange painting
- use a degas inspired color palette
- apply pastels… a medium degas often sketched with
- gridded paper is a nod to degas as a draftsman


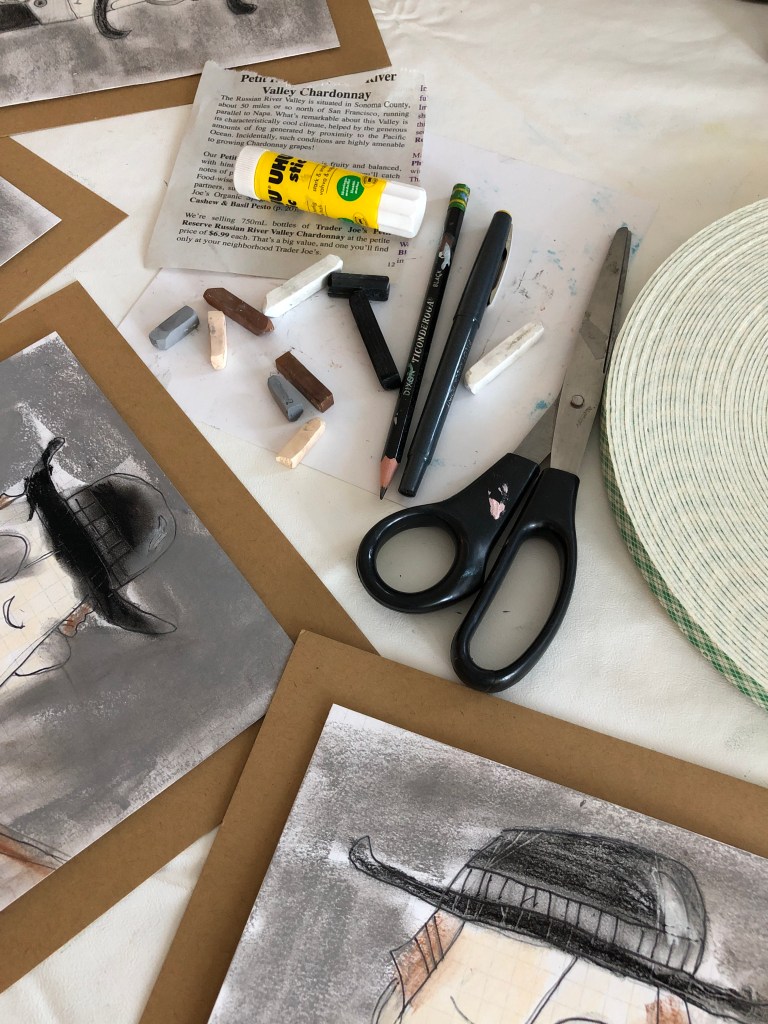
MaTerials
- pre-cut 7” x 7” black and white 1/4” grid graph paper (link to printable graph paper)
- pre-cut 8 1/2” x 8 1/2” black cardstock
- paper cutter is handy
- pencil
- black felt tip pens or thin sharpie
- scissors
- newspaper, trader joe’s flyer, or book pages
- chalk pastels (we used prismacolor nupastels: buff (skin), gray (walls), brown (hair), black (hat + jacket)& white
- glue stick
- 3M foam tape
Tutorial for drawing Cotton exchange Man:
Tutorial for applying pastels to Cotton exchange man
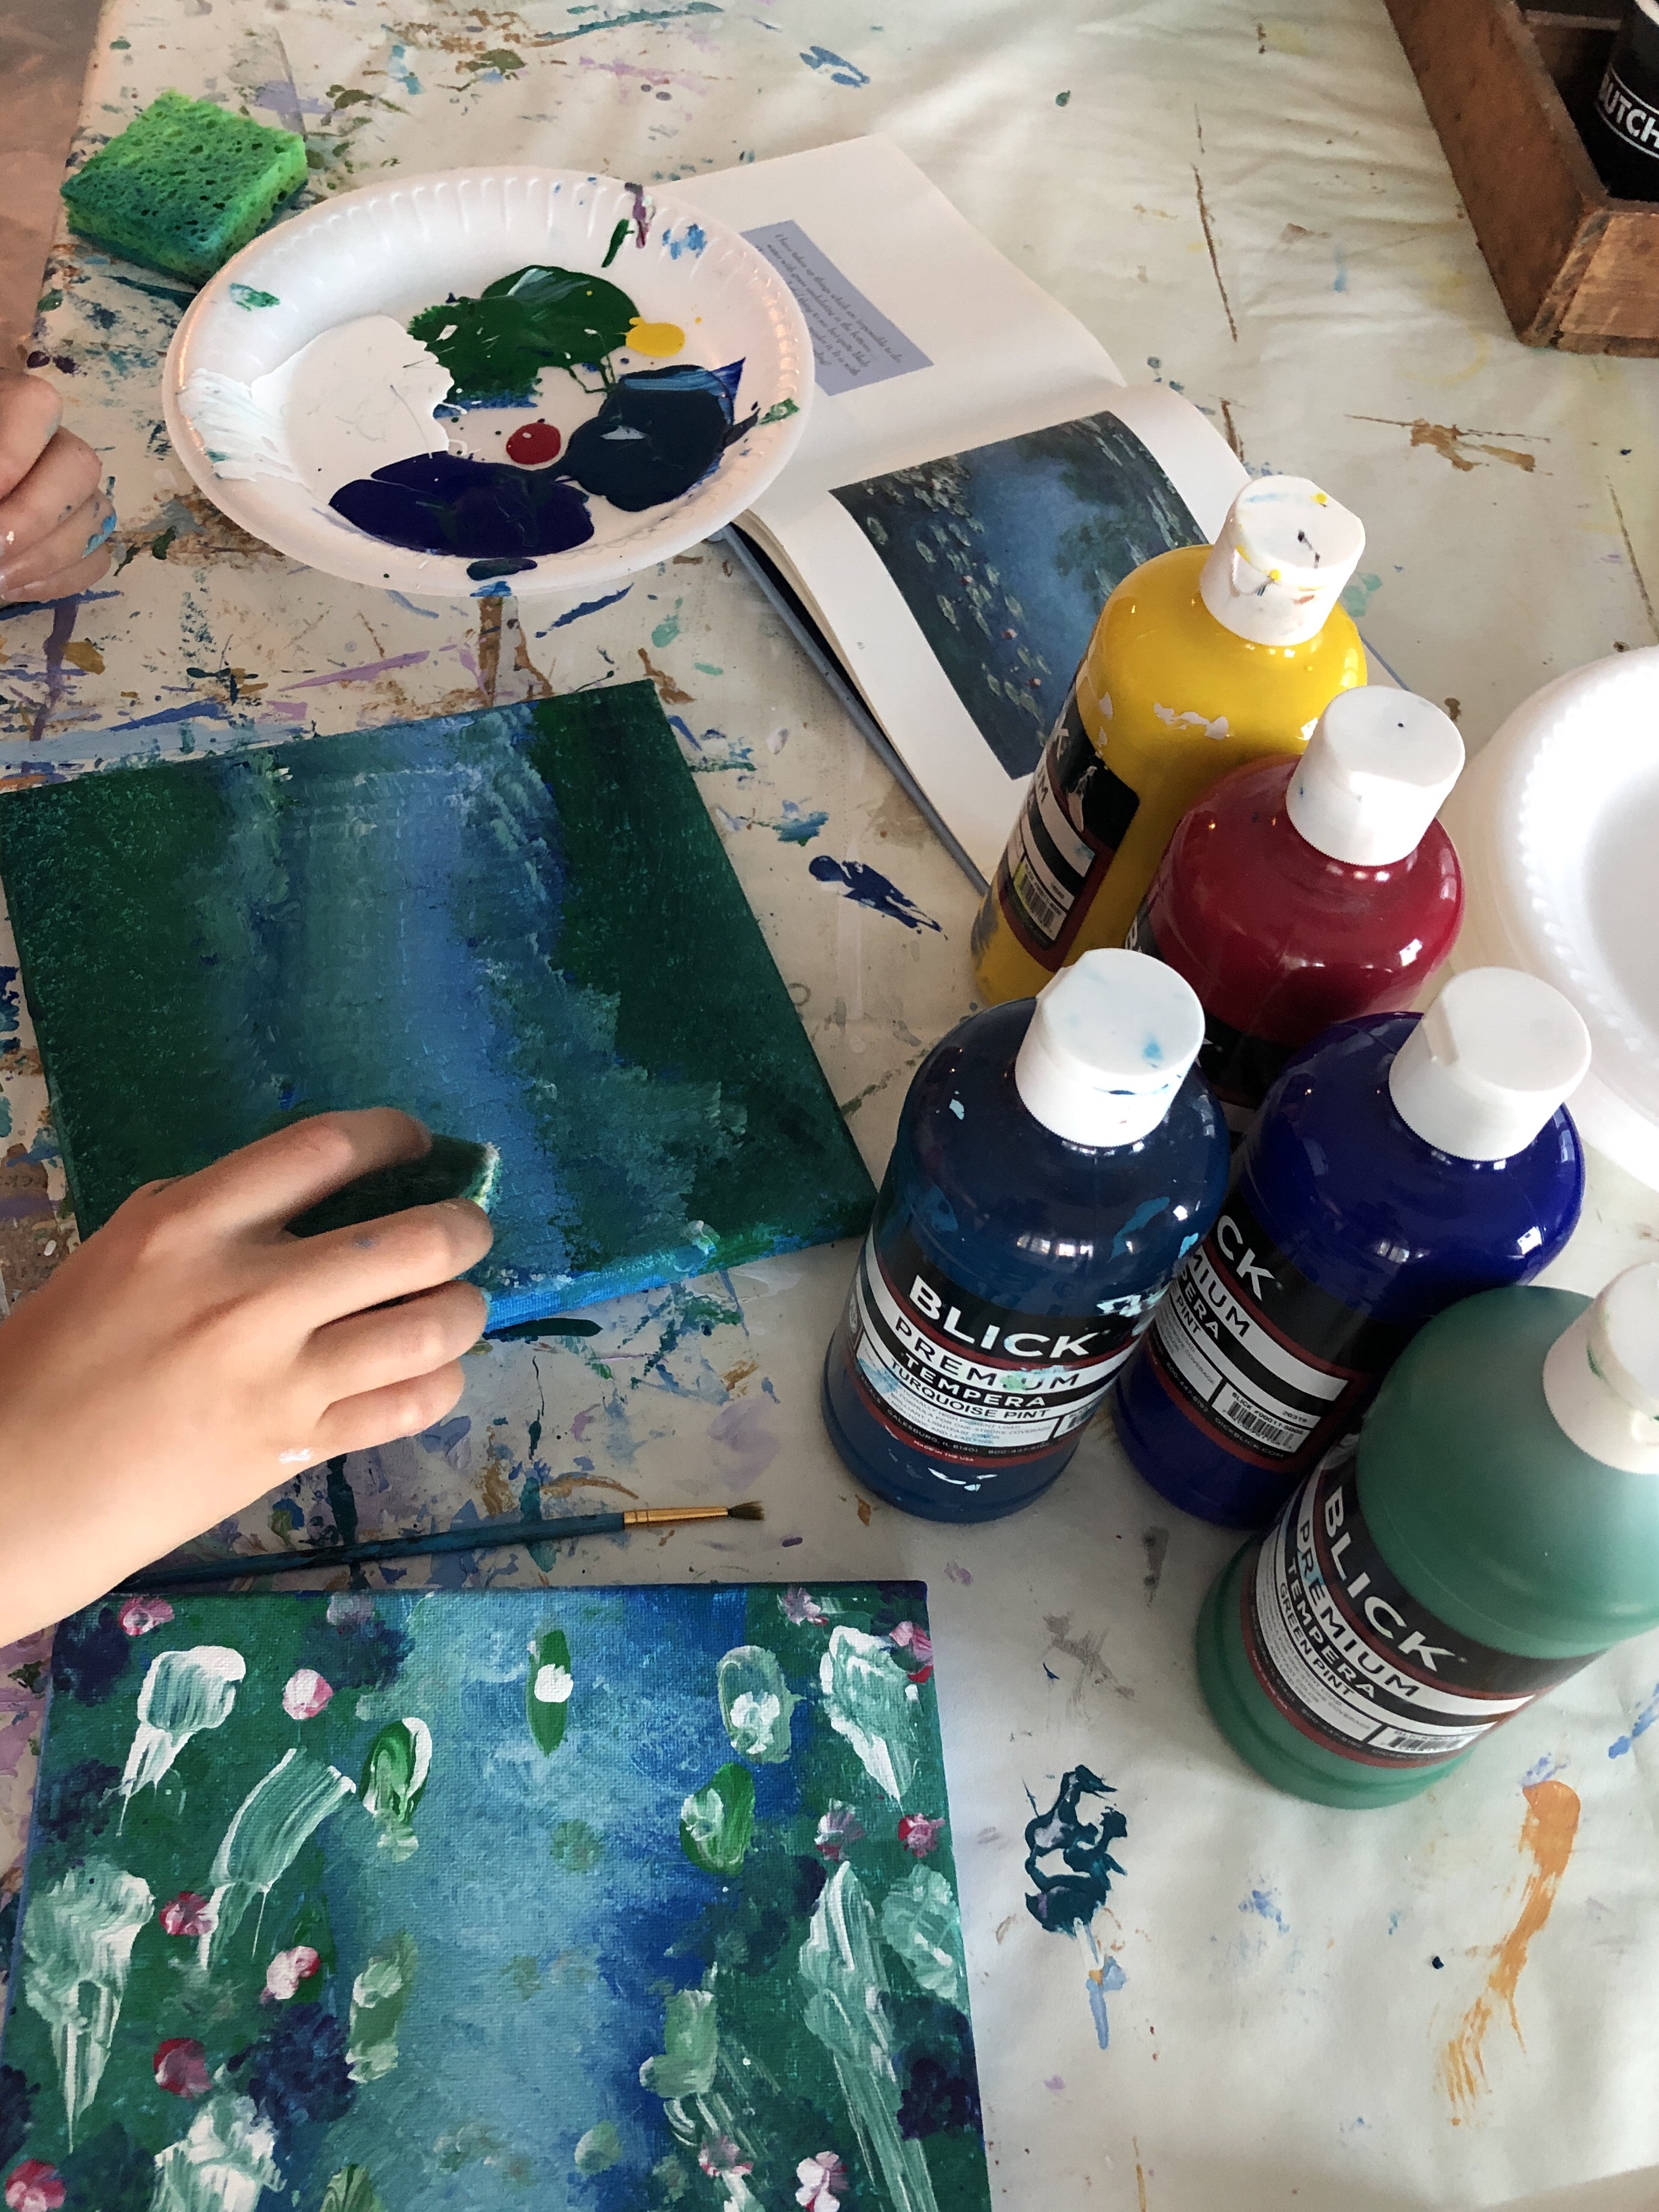
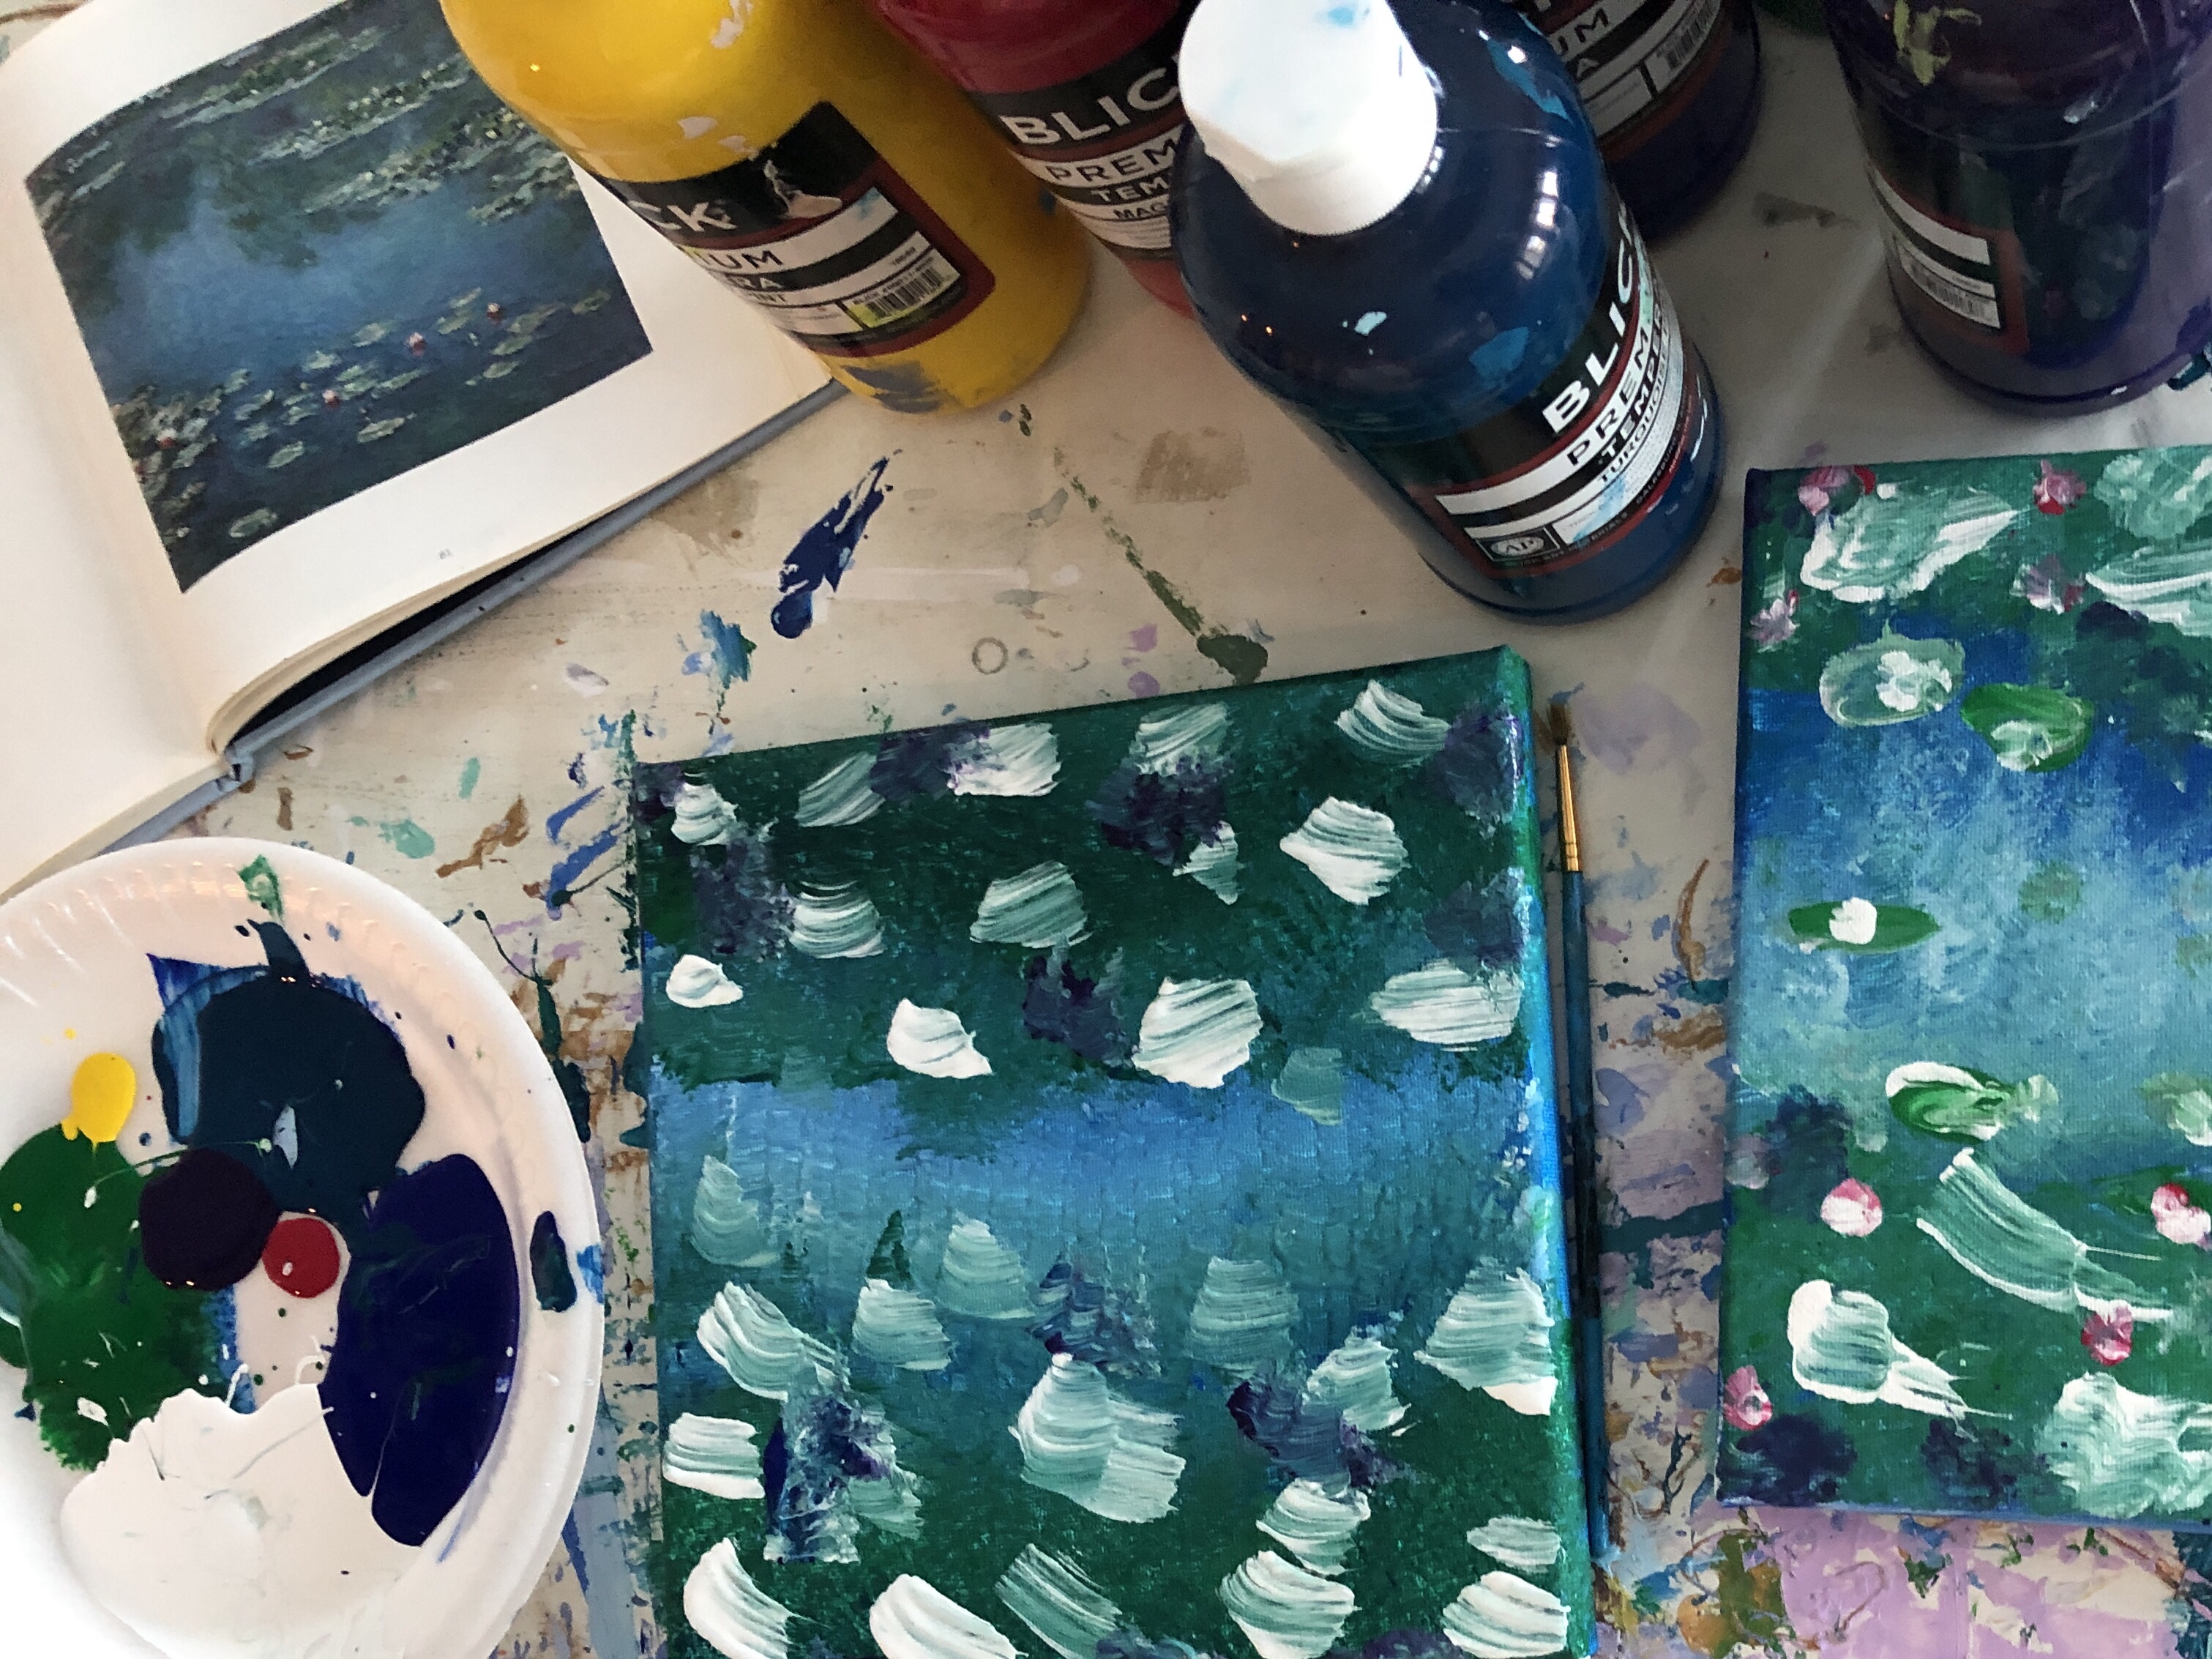
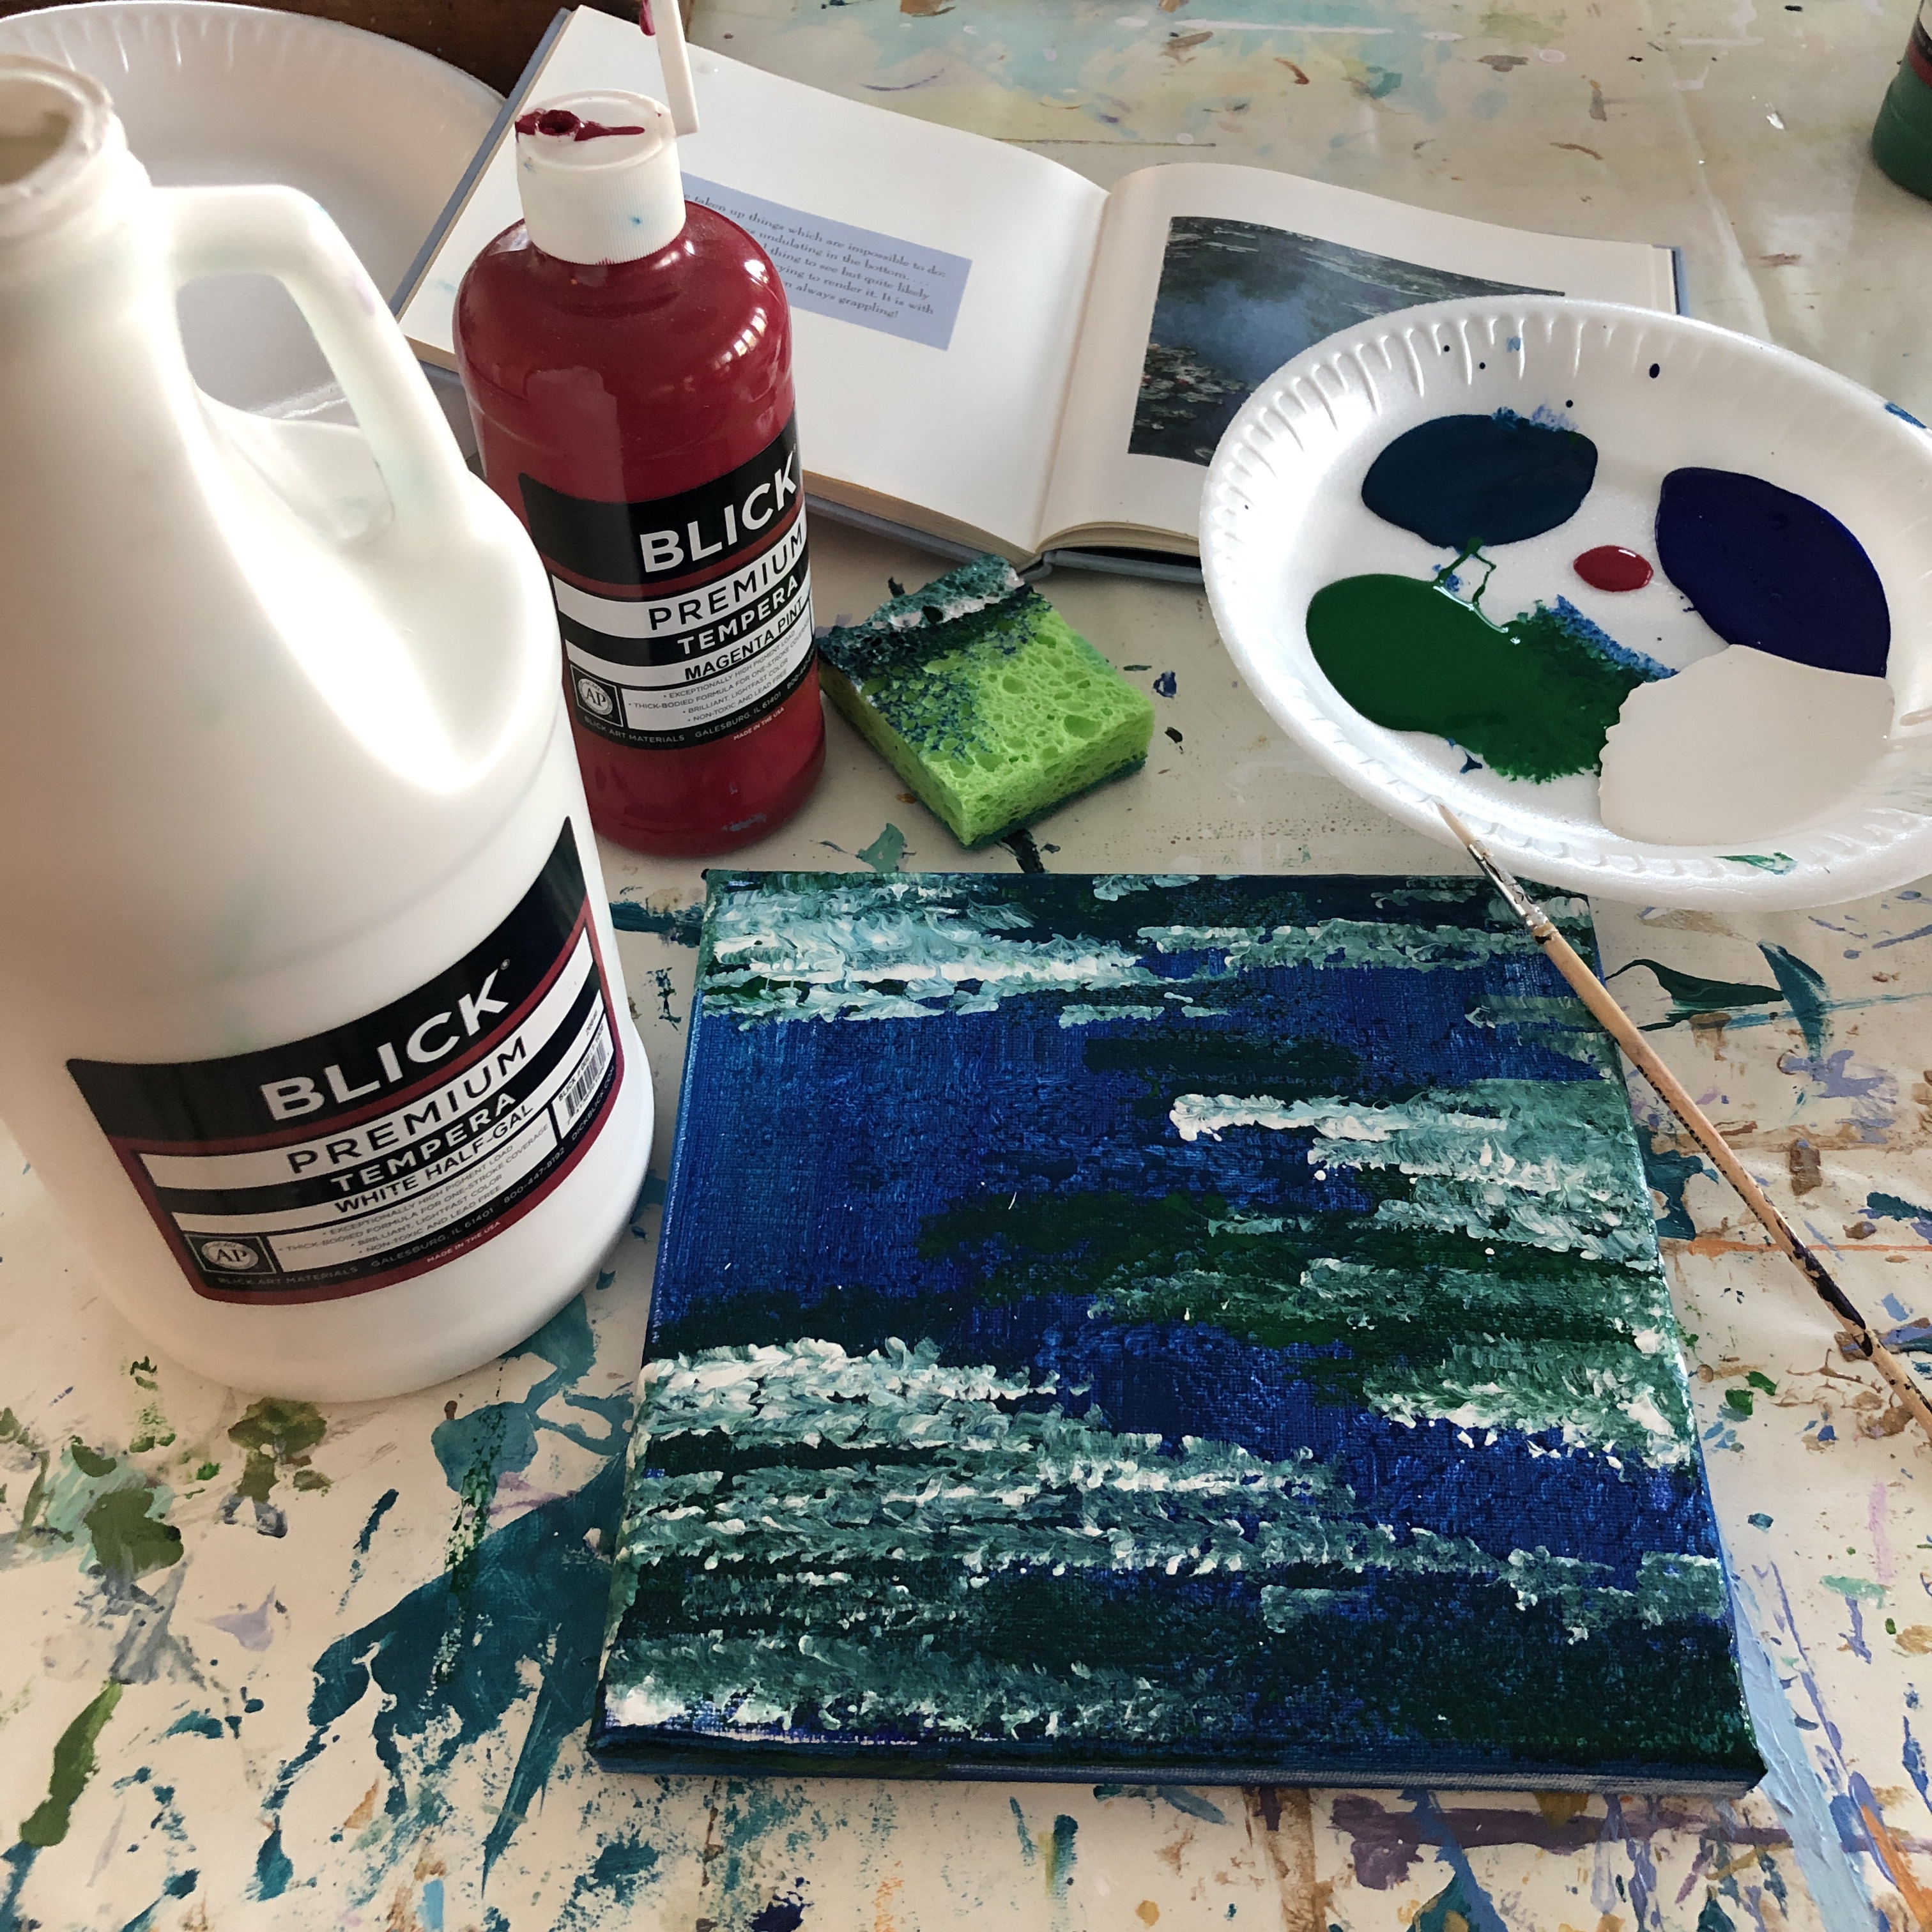
NO.4 monet 1840-1926 IMPRESSIONIST

The project+The artist
Project iNspiration:
- focus on monet’s water lilies 1906
- notice monet painted outdoors or “plein air” at his home garden in giverny, france and would capture the mood in a painting rather than painting realistically
- focus on brighter color…. monet loved color

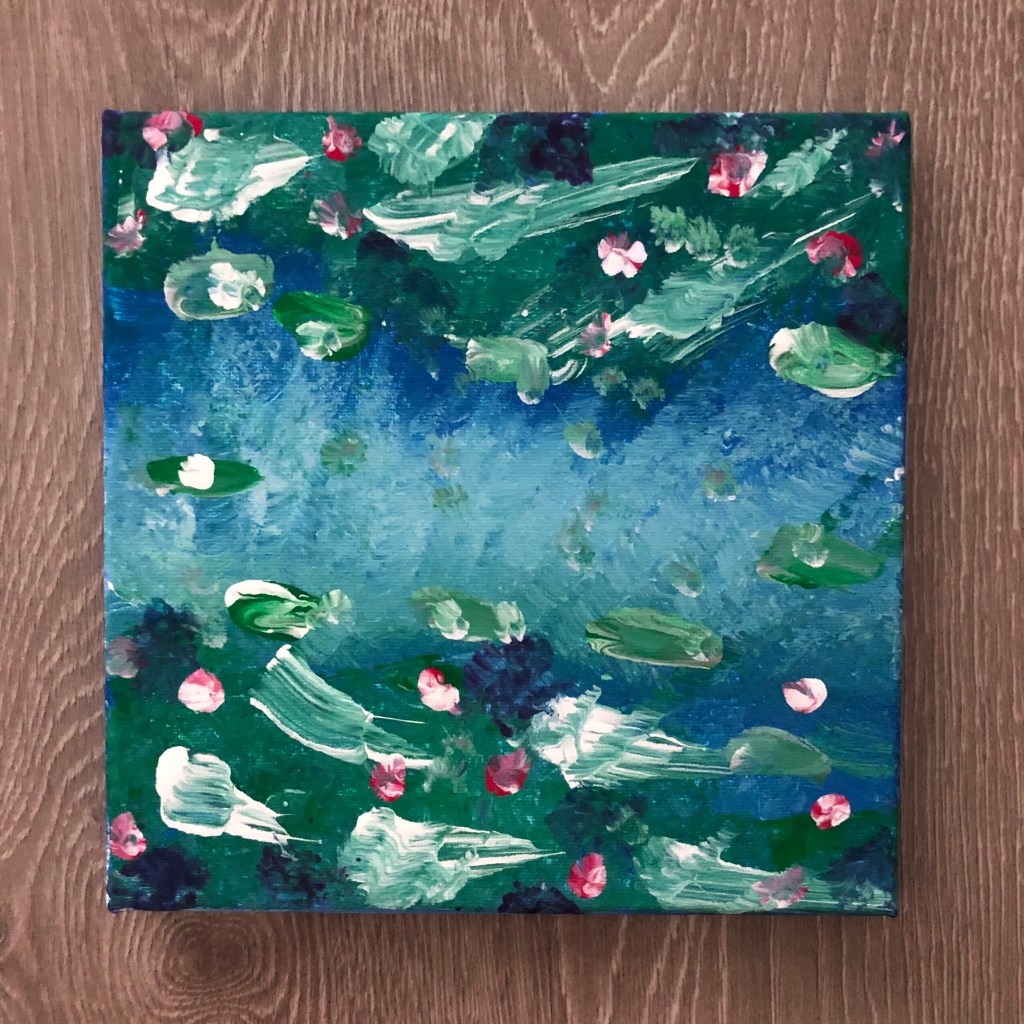

MATERIALS
- 8” x 8” canvas
- tempera paint (poster paint): turquoise, blue, green, yellow, white, magenta
- styrofoam plate for a paint palette
- sponge
- paint brush
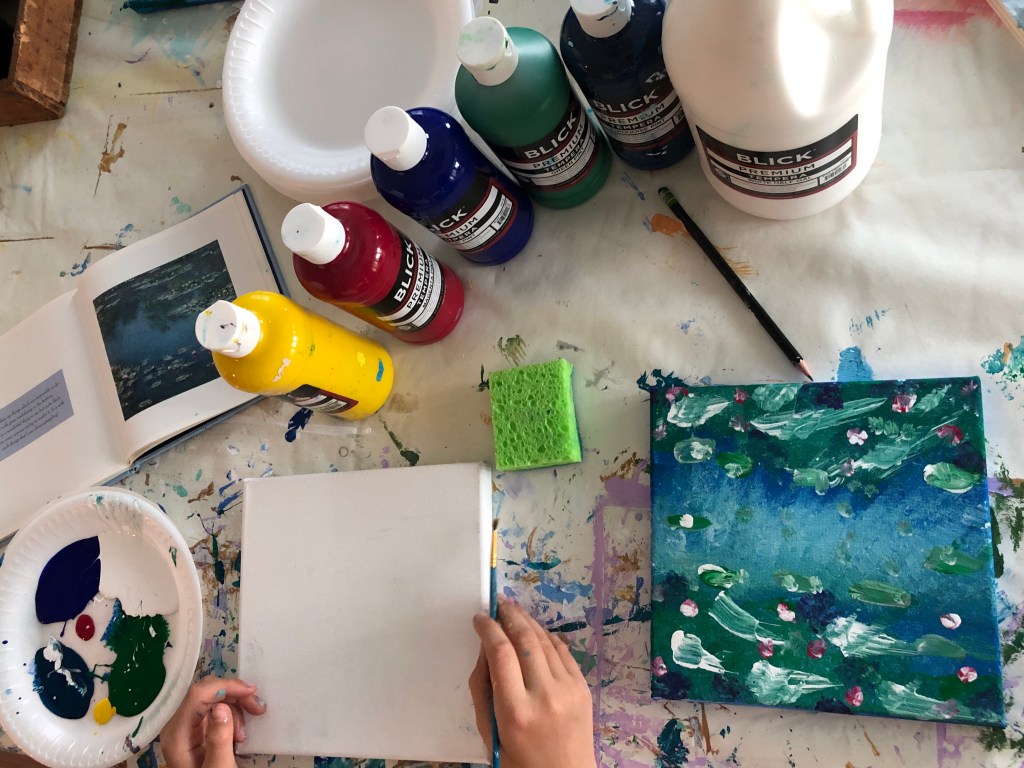
monet project tutorial


No.5 berthe morisot 1841-1895 impressionist

The project + the artist
project inSpiration:
- focus on + take inspiration from the landscape portion of morisot’s painting: “west cowes, isle of wight. port in england 1875”
- use her style of blending colors to create a painting rather than bold lines
- mix colors directly on the canvas
- create texture by applying paint thickly
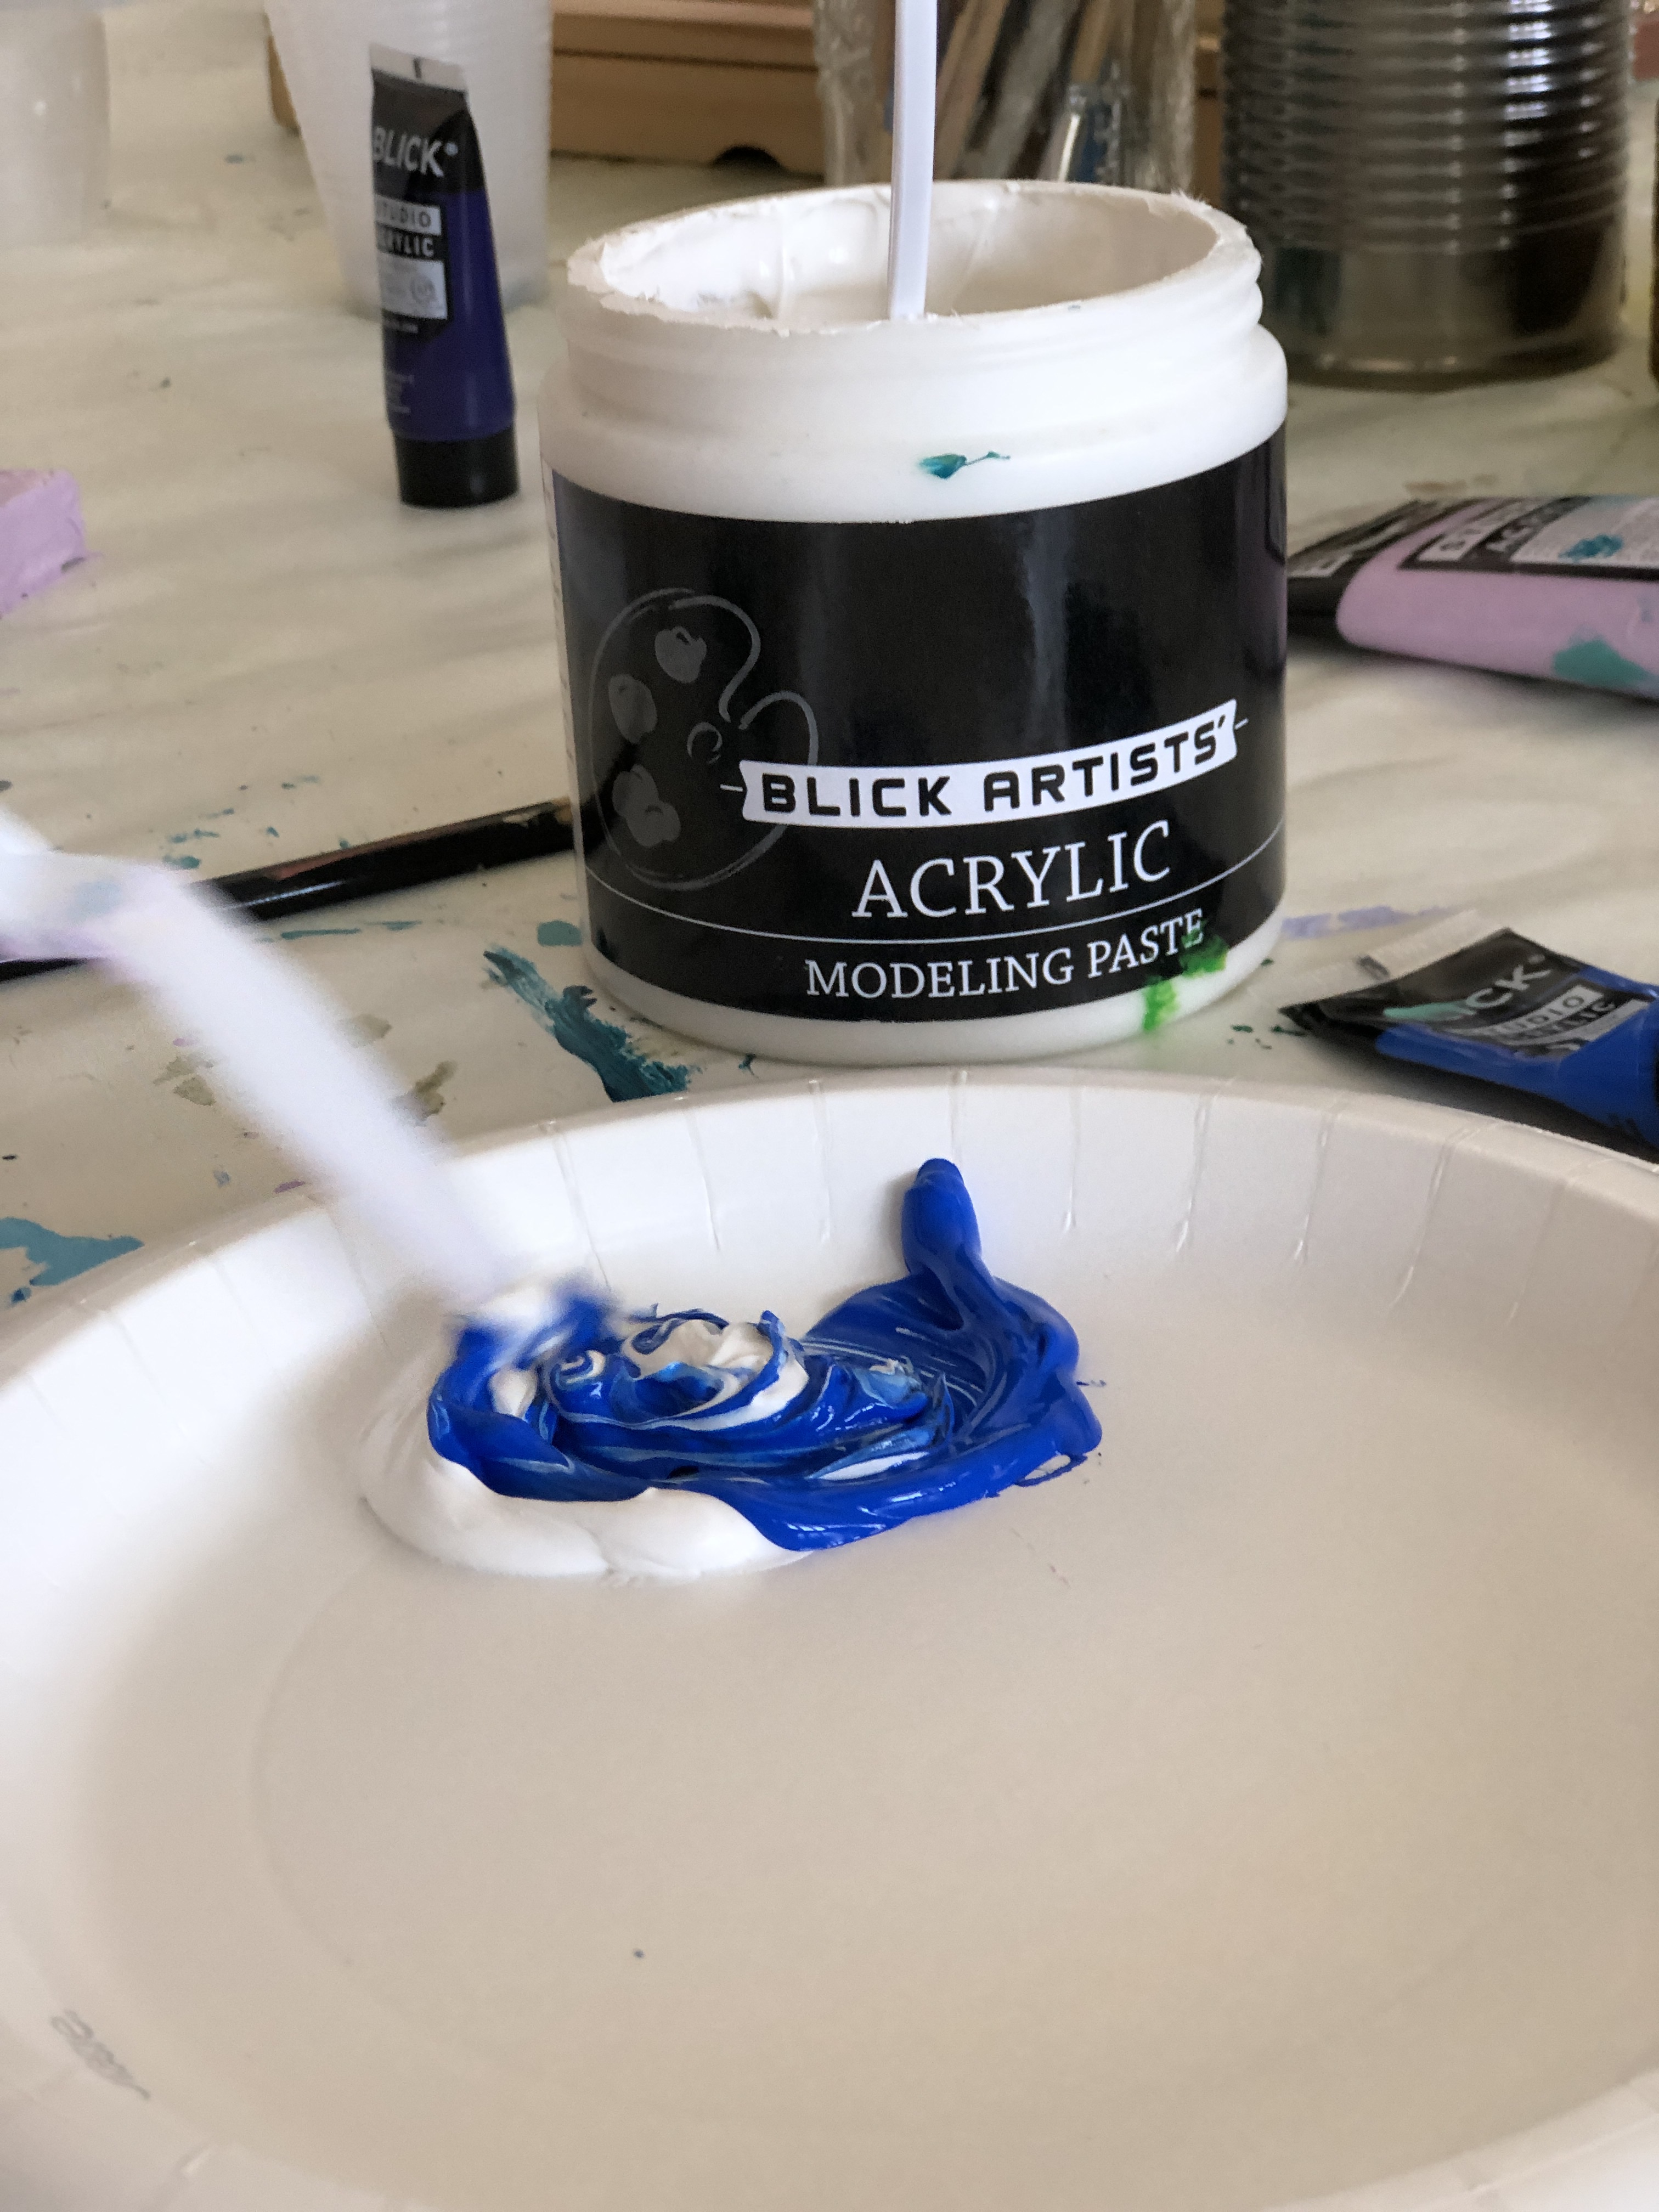
- add acrylic modeling paste to paint and use a palette knife (a tool morisot used)
- notice how her paintings reflect family subject matter and what life was like in the upper middle class


Materials
- 8 x 8 canvas panel for each student
- pencil
- plastic diamond trowel palette knives (one for each color)
- brushes for the three base colors
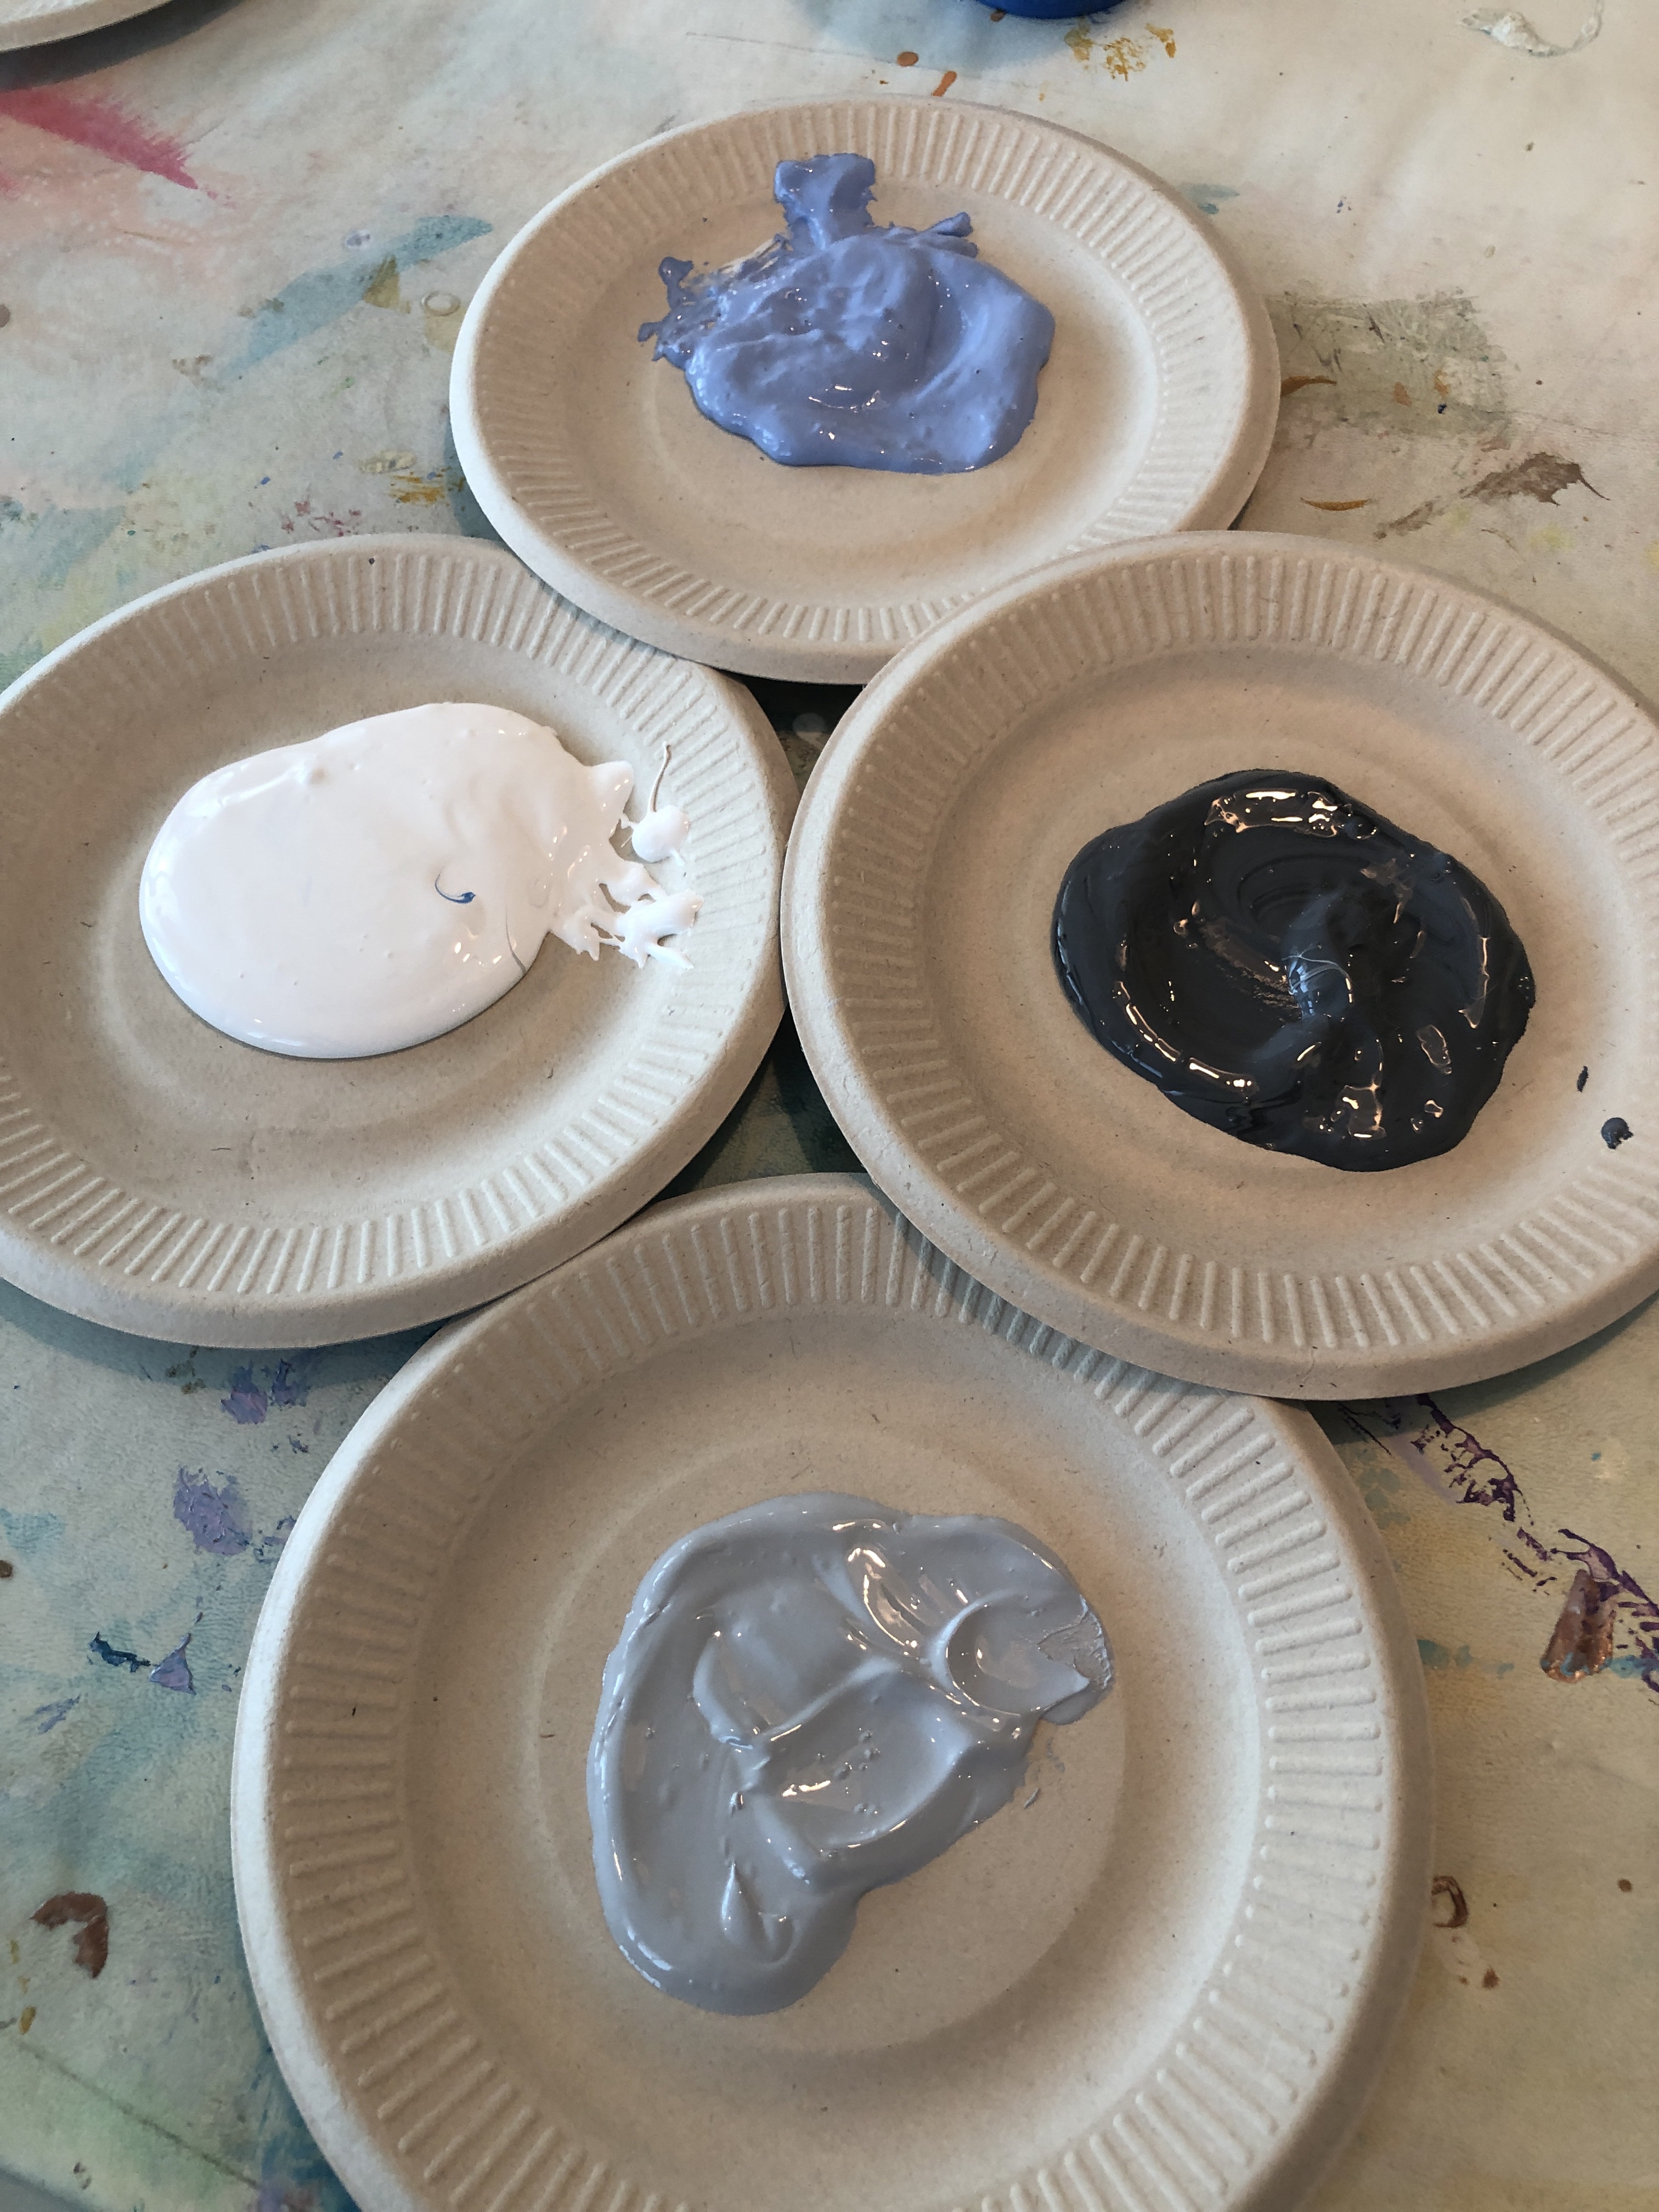
- acrylic paint: blue violet light, primary blue, raw sienna, sage blue, phthalo blue, neutral gray, green oxide, white, payne’s gray
- acyrlic modeling paste
- small paper plates for paint
- paper towels

morisot project tutorial
step No.1
this will be our most involved project…. organization is the key to success…. try placing students at “stations”
table/station one: paint the three base colors with brush and sky portion
table/station two: paint water
table/station three: sand
OR give them paint colors as they need it. two can share one plate of color
Step no. 2
divide canvas into three with pencil. bottom sand will be about 1/4 from the bottom, from there divide the canvas in half for the water and sky
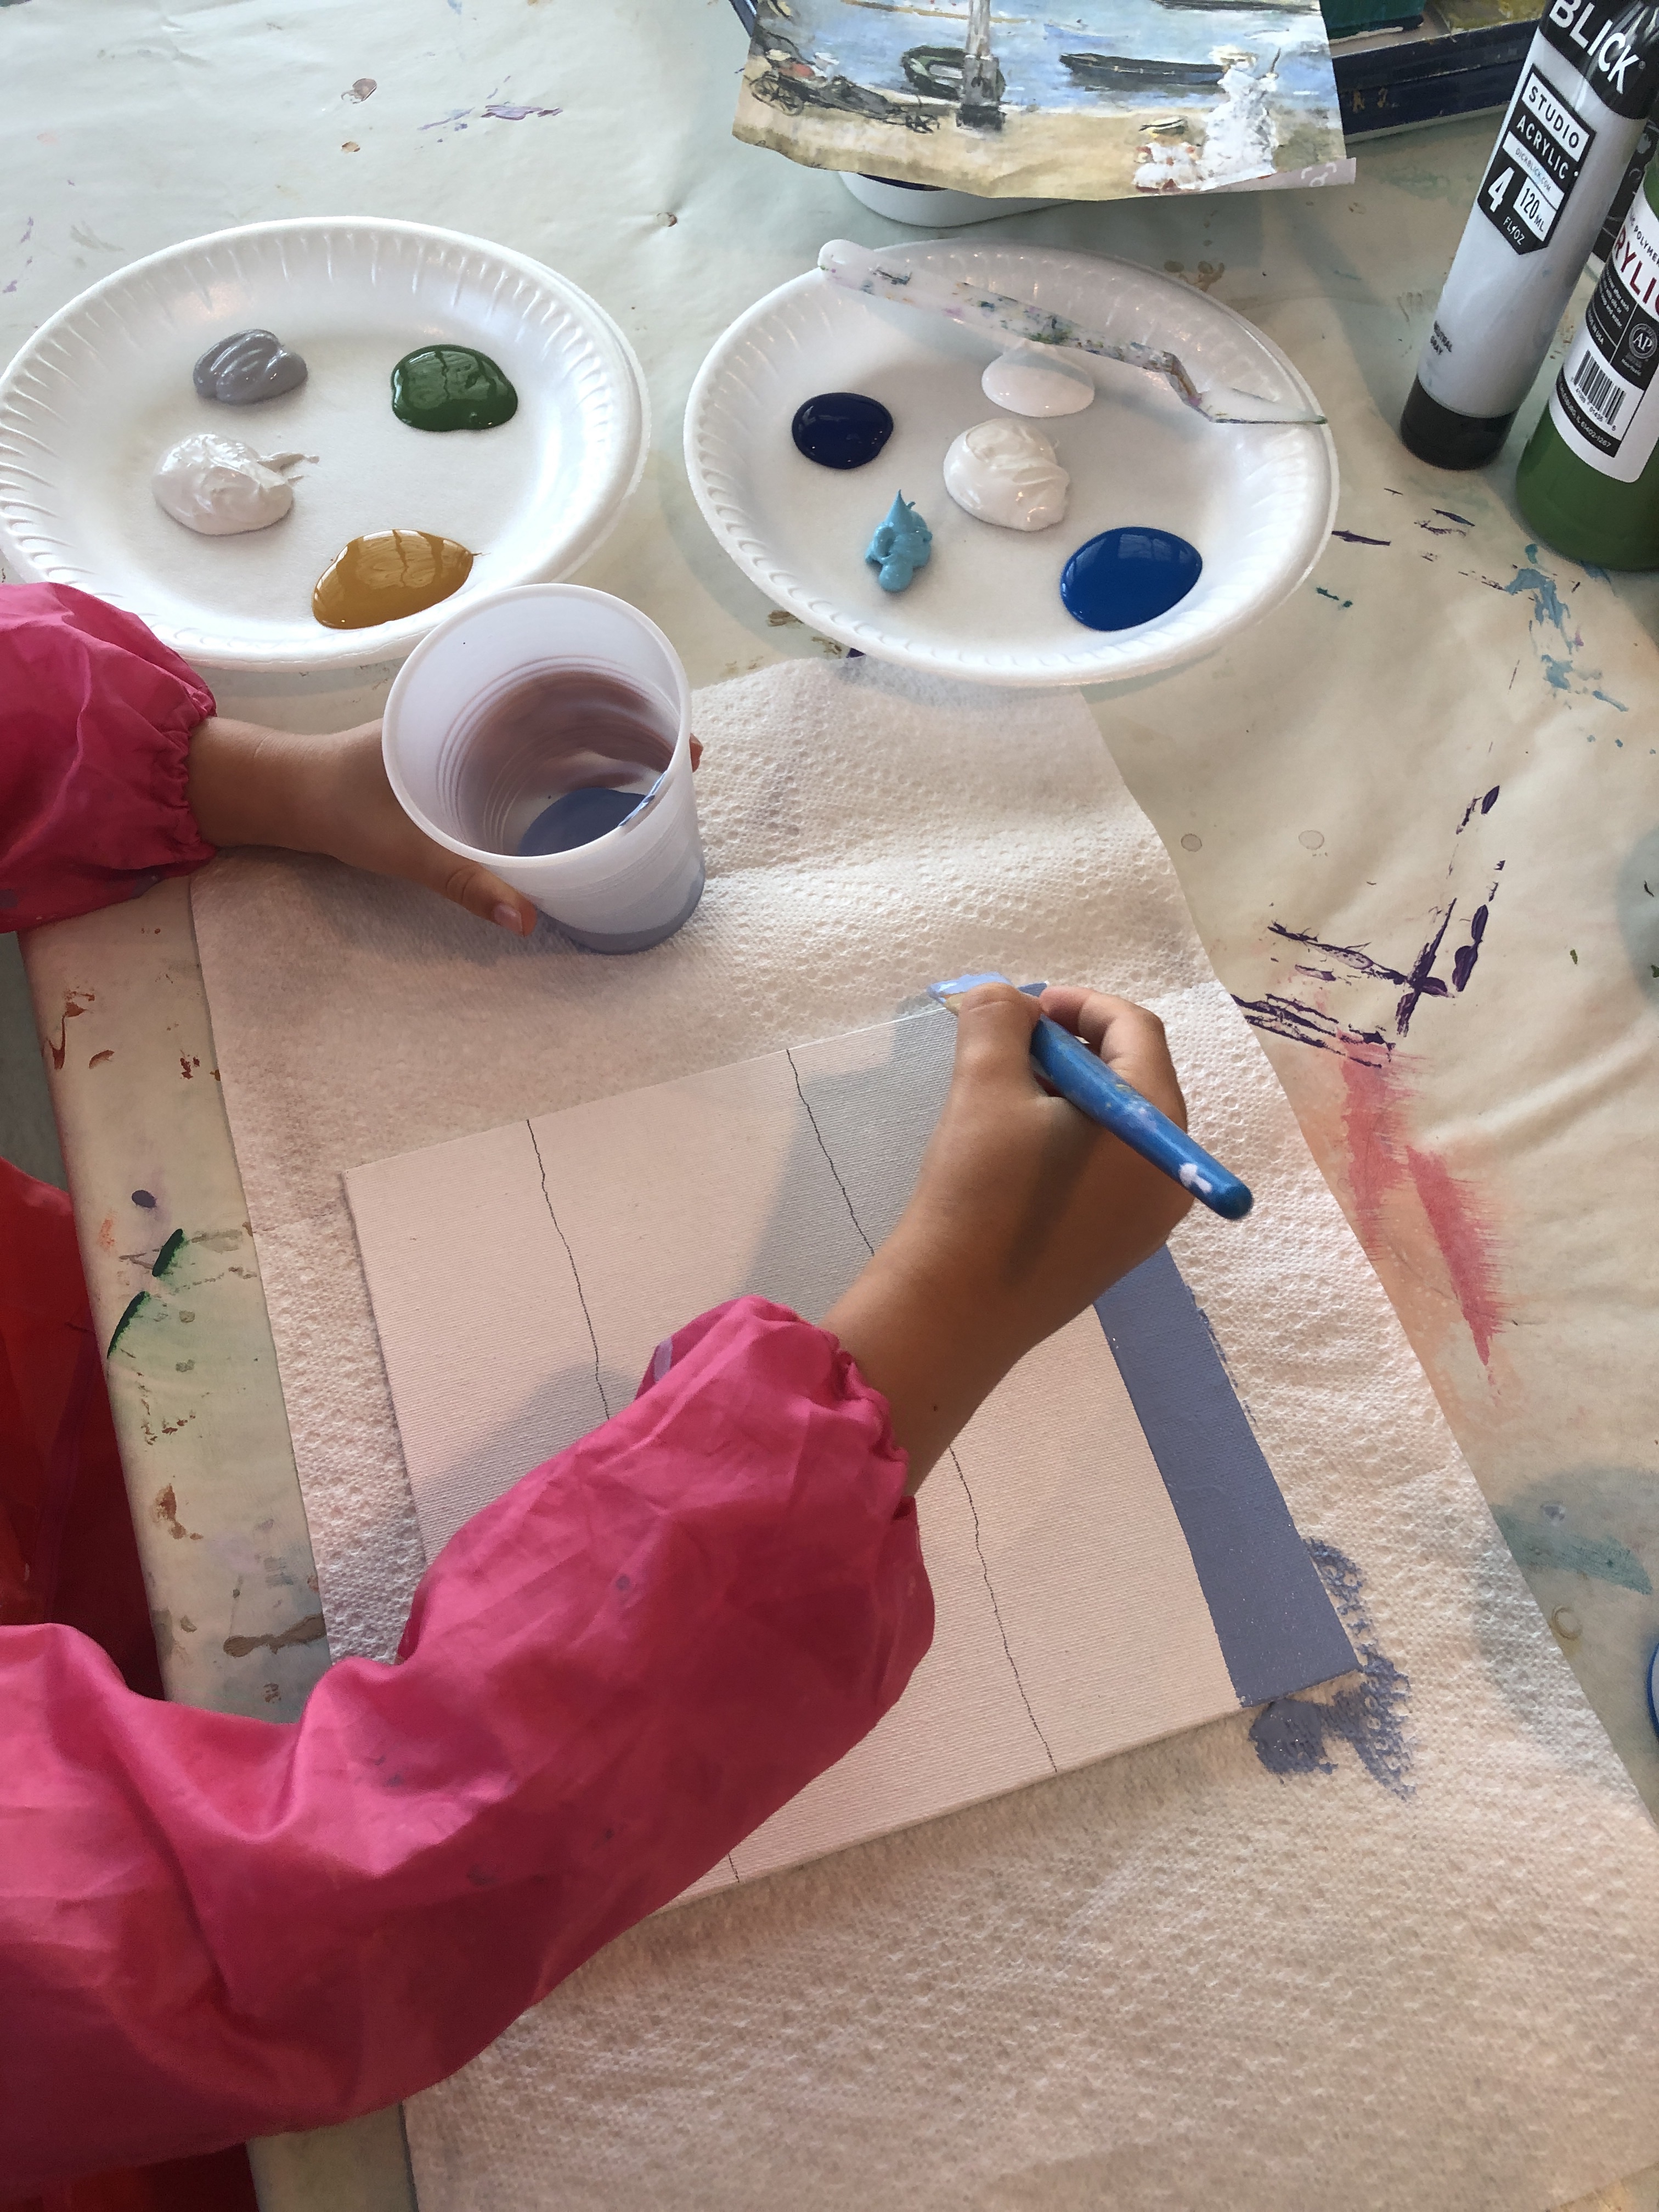
Step no.3
paint canvas in three colors with brush first: place paint in three cups
sky: blue violet light, water: primary blue, sand: raw sienna
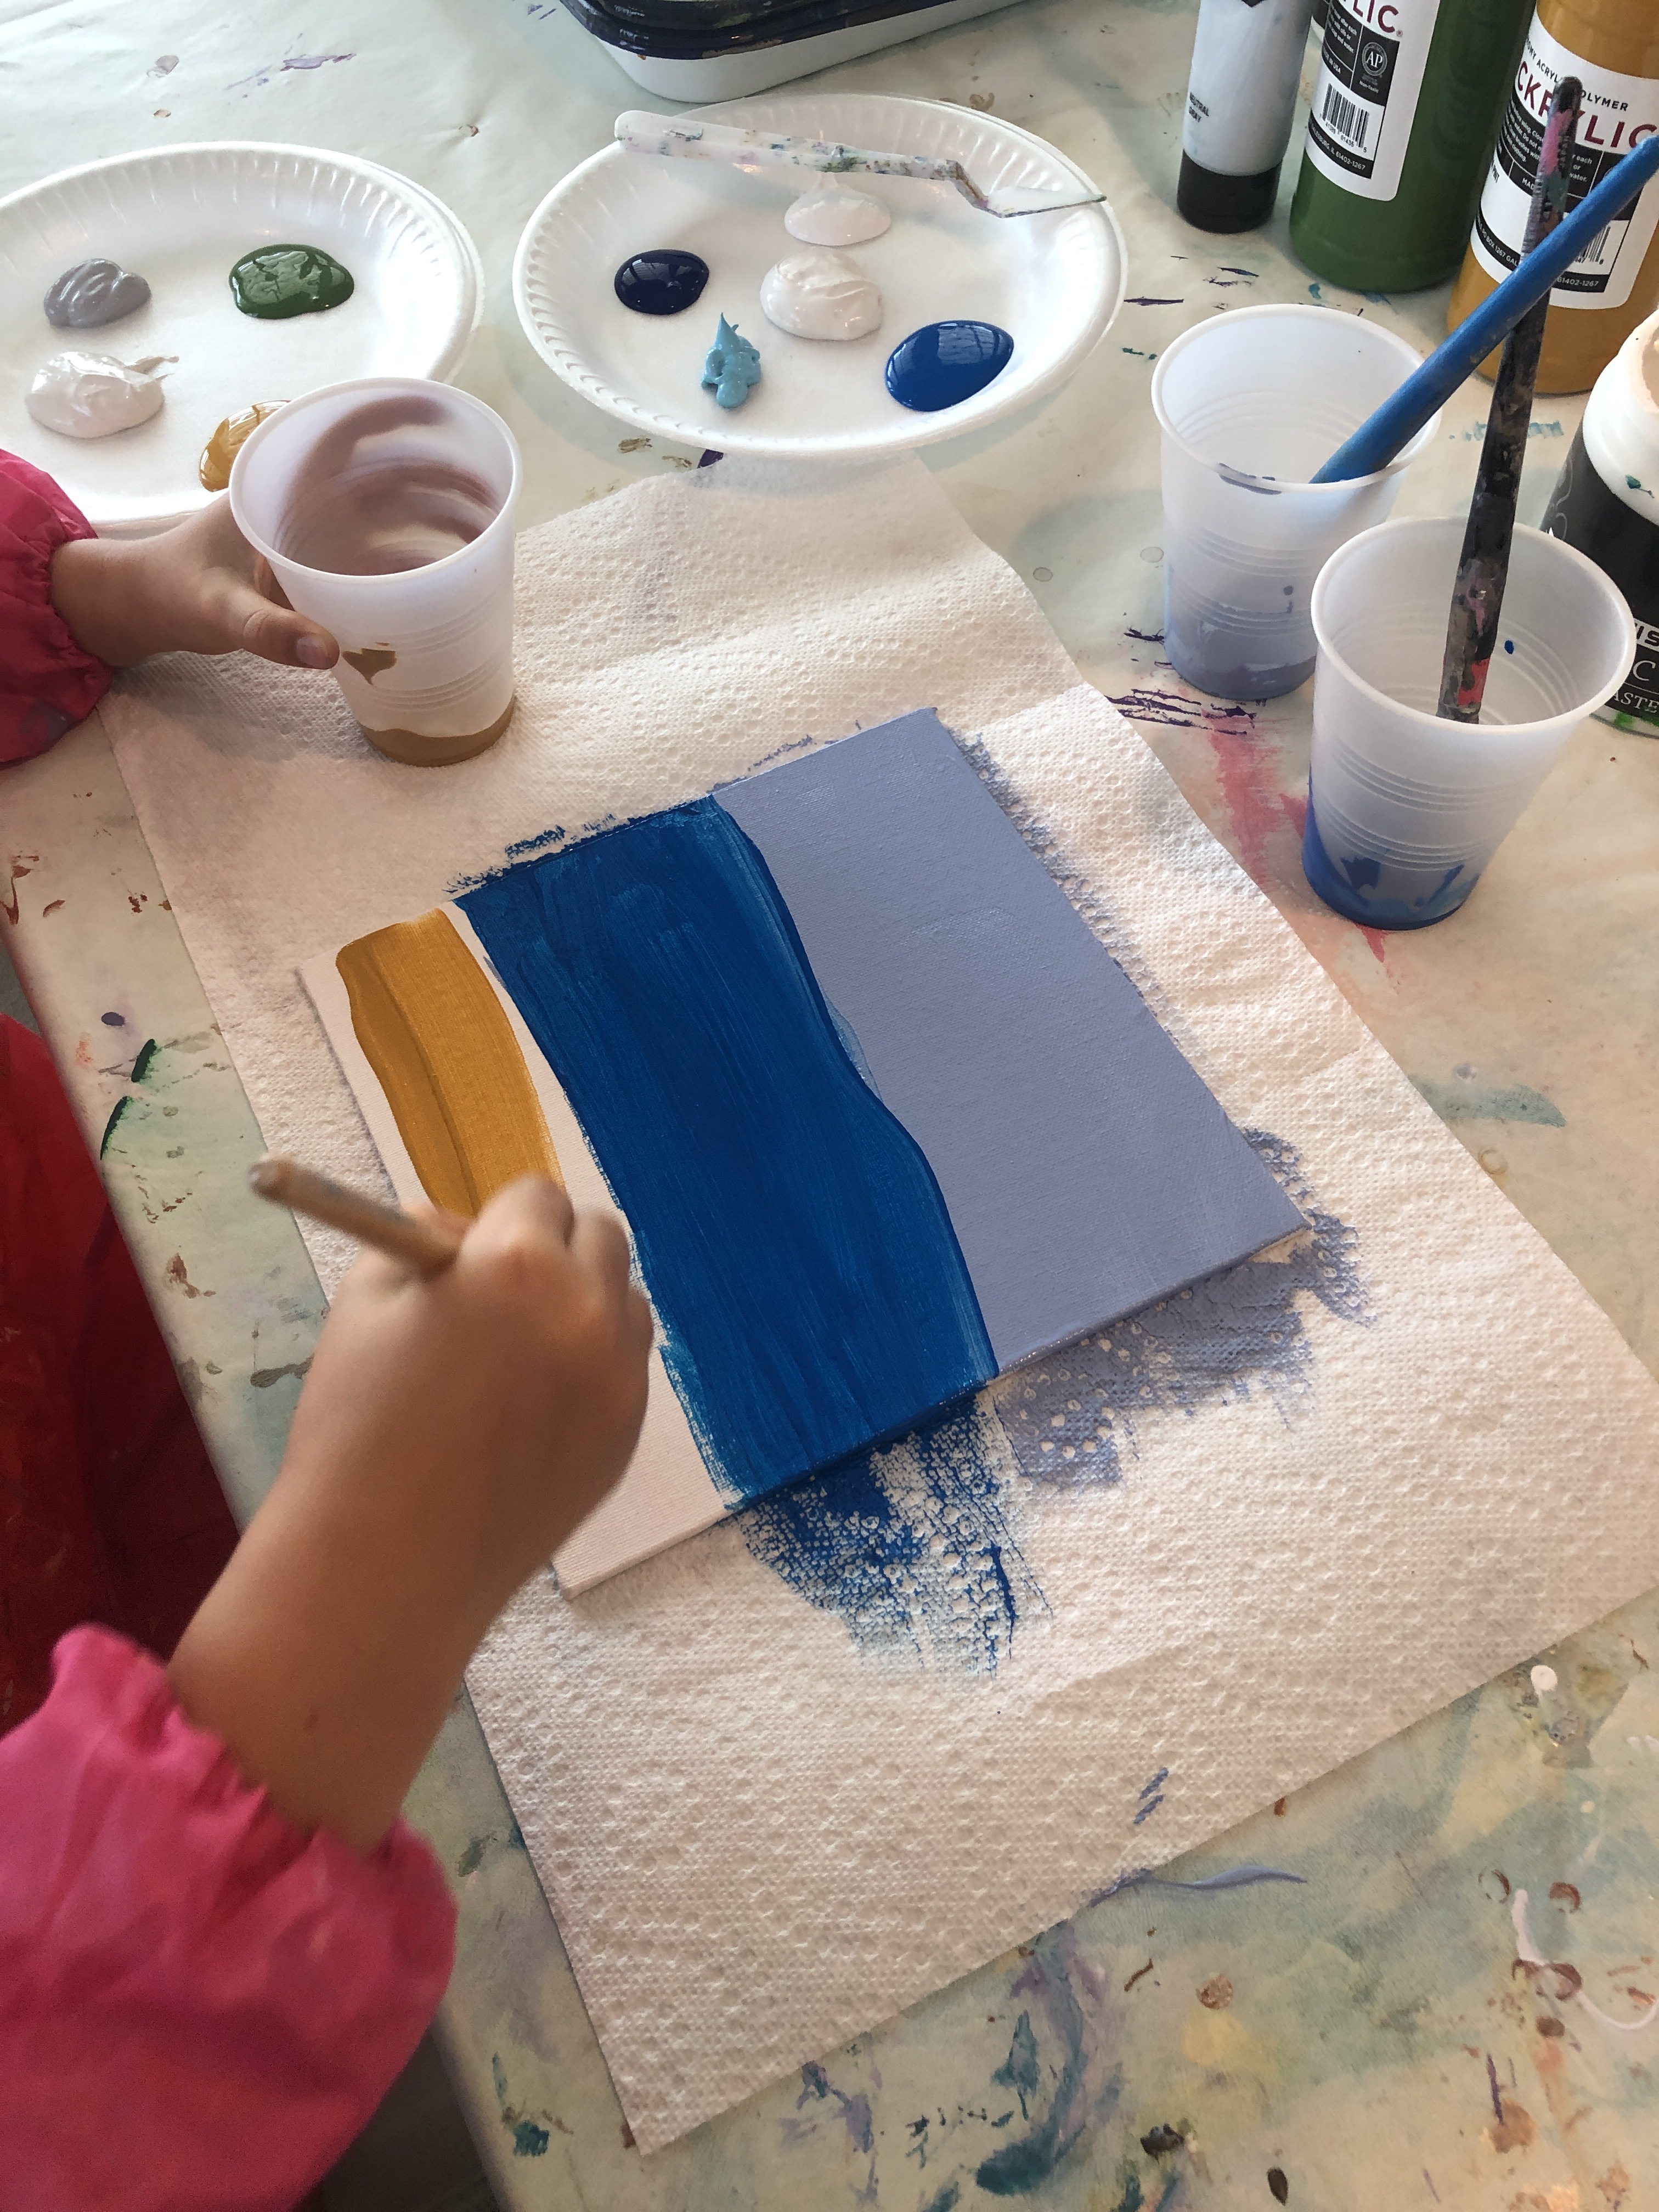

Step no.4
use a palette knife to paint the rest of the project
glob it on: mix modeling paste into the base colors
sky: blue violet light (mixed with modeling paste), white, charcoal, neutral gray
water: sage blue (mixed with modeling paste), phthalo blue, neutral gray, white
sand: raw sienna (mixed with modeling paste), green oxide, white
*the idea is to layer the colors and mix a little on the canvas, but be careful to not over work and mix all the colors together to make one color


No.6 Van GOGH 1853-1890 modern impressioNist

the pRoject + the artist
project inspiratiOn
- focus on + draw inspiration from van gogh’s starry night
- use vivid color (with oil pastels) as we see in many of van gogh’s paintings
- use van gogh’s dashed line style to create our project
- create texture (with oil pastels) as seen in van gogh’s work
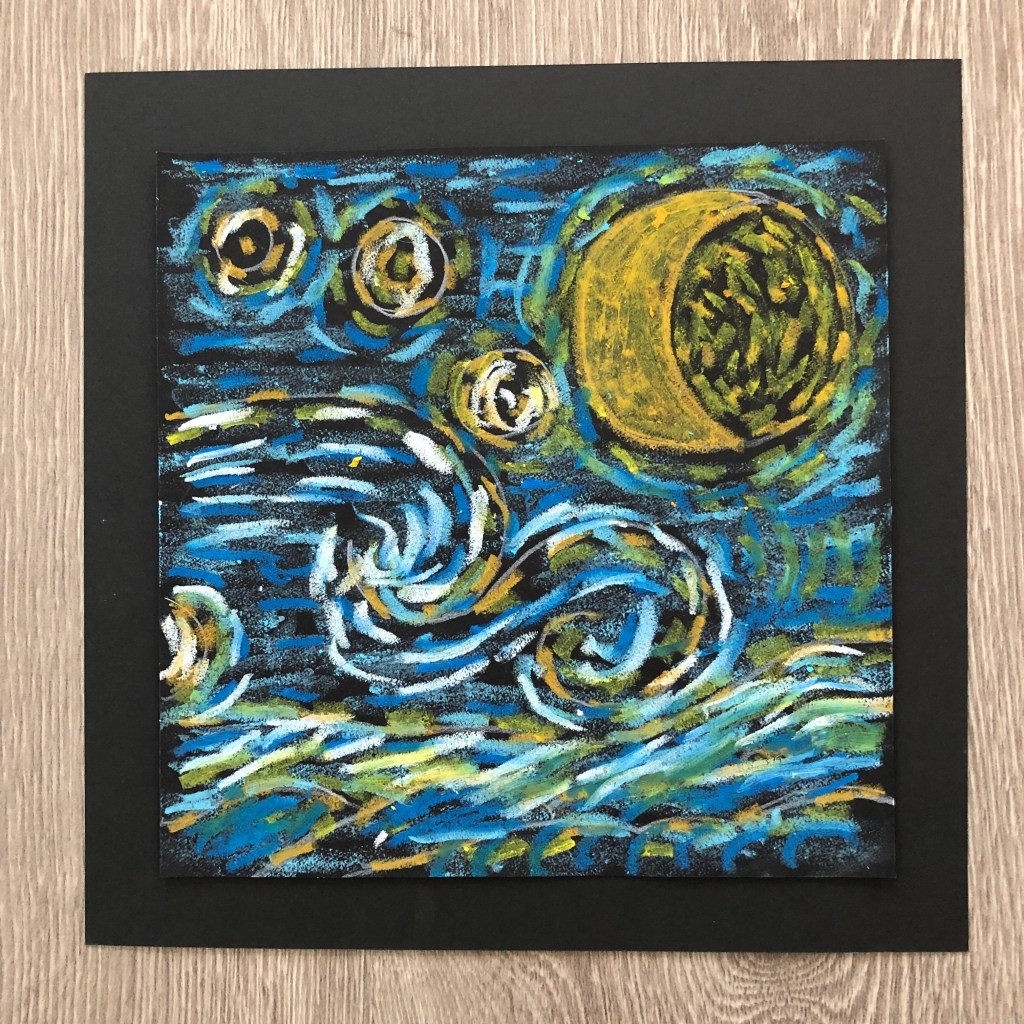
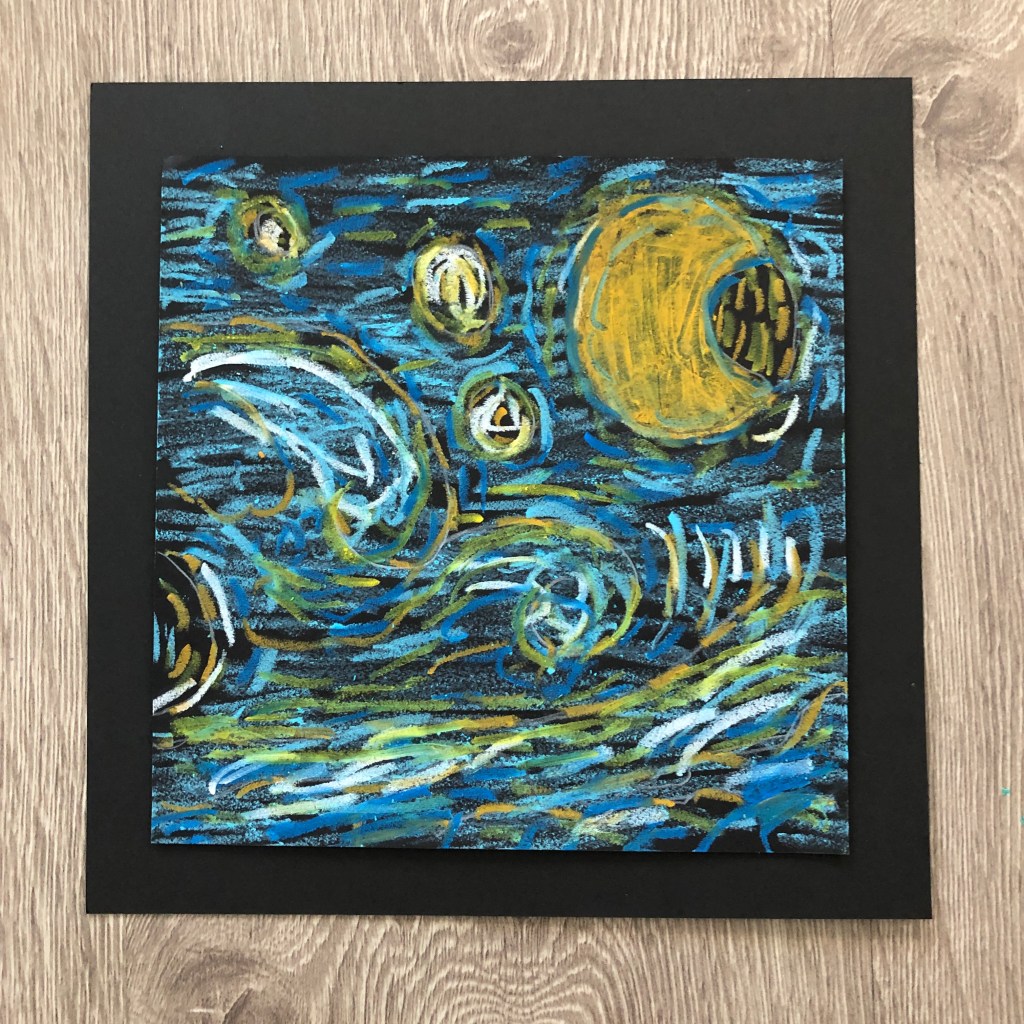
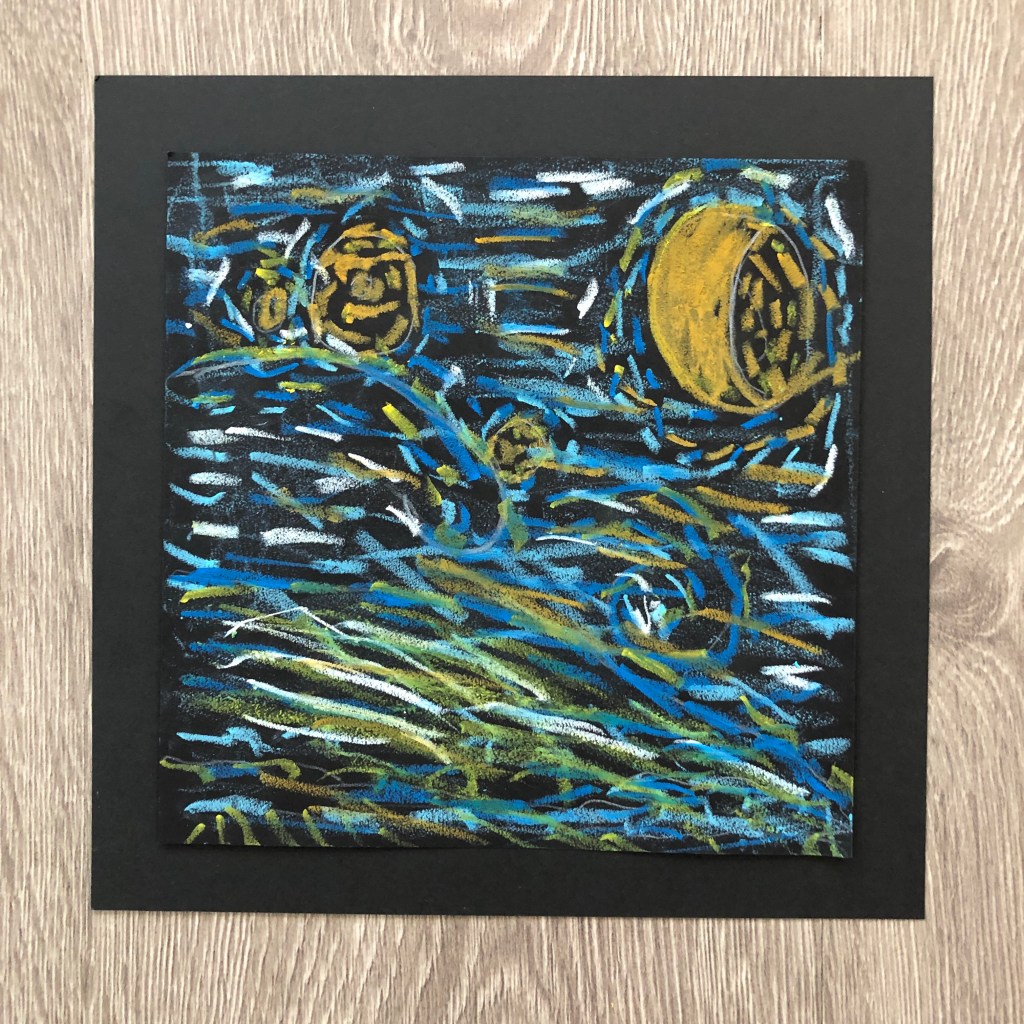
Materials
- black paper pre-cut to 7 x 7
- white color pencil (one for each student)
- oil pastels: primary blue, turquoise, yellow, mustard, white (option: break in half and use one for two students)
- back cardstock pre-cut to 8 1/2 x 8 1/2
- 3M foam tape

van Gogh project tutorial
Back ground drawing for vAn Gogh project

